
Don’t miss out on any new features
Plugin news, updates and practical Shopware tips. Once a month.
Installation instructions
Install the extension via the extension area.
OpenAI API key
- Go to https://platform.openai.com/.
- Log in.
- Create a new project.
- Go to your profile and go to the "API keys" section https://platform.openai.com/settings/organization/api-keys.
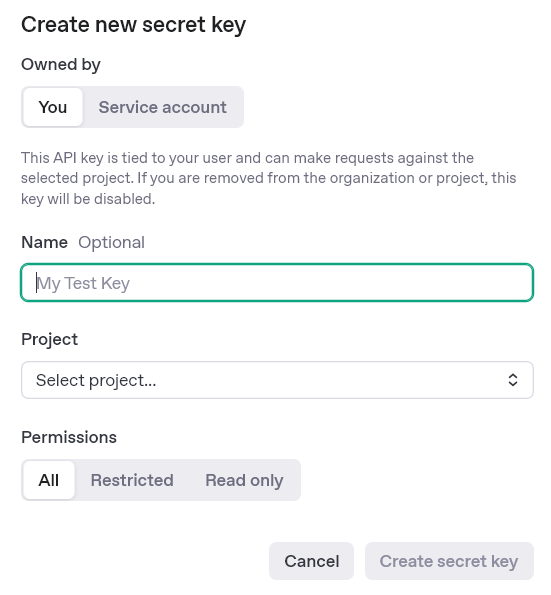
- Create a new API key via "Create new secret key".
- Top up credit so that the OpenAI API works. https://platform.openai.com/settings/organization/billing/overview
- Optional: We recommend that a usage limit is set so that no unnecessary costs are incurred in the event of an error https://platform.openai.com/settings/organization/limits
Gemini API key (Google AI Studio)
- https://aistudio.google.com/ and sign in with your Google account
- Left in the menu on Get API key click
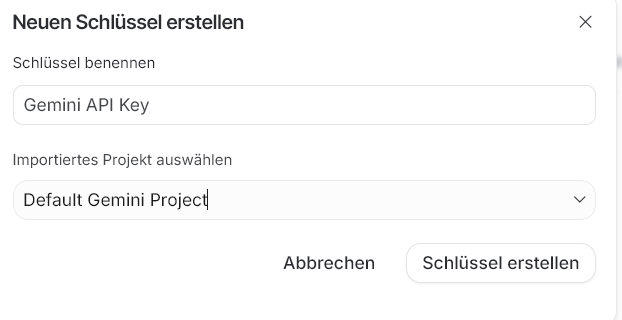
- Create API key and create a new Google Cloud project if necessary
- Copy the generated key
- Insert and save the key in the app settings in the Shopware backend
- Optional: We recommend that you set a rate limit for usage so that no unnecessary costs are incurred in the event of an error https://aistudio.google.com/rate-limit
Claude API key (Anthropic Console)
- https://console.anthropic.com/ call up and log in / register
- Left in the menu on API Keys click
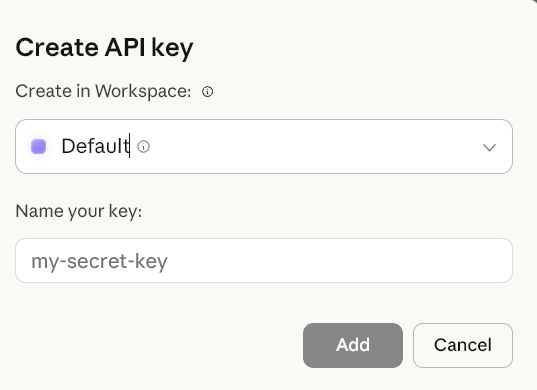
- Create Key select, assign a name (e.g. „Shopware - “) and confirm
- Copy the displayed key immediately (it is only displayed once)
- Insert and save the key in the app settings in the Shopware backend
- Optional: We recommend that a usage limit is set so that no unnecessary costs are incurred in the event of an error https://platform.claude.com/settings/limits
Mistral API key
Go to https://console.mistral.ai/
Create an account or log in
Create API key and enter in Shopware extension
Top up credit
Note: European provider (GDPR-compliant)
Setting up the extension in Shopware
API credentials
- Enter the API key, which should start with „sk-proj“ for OpenAI.
- Select your desired AI model.
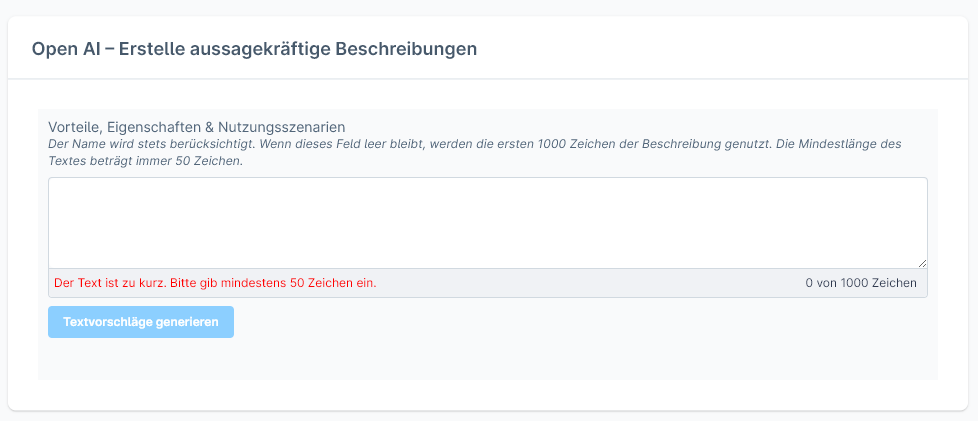
AI processing single entity
Product description
- Go to Catalogues -> Products and select your desired product.
- If there is a product description, this and the product title are used.
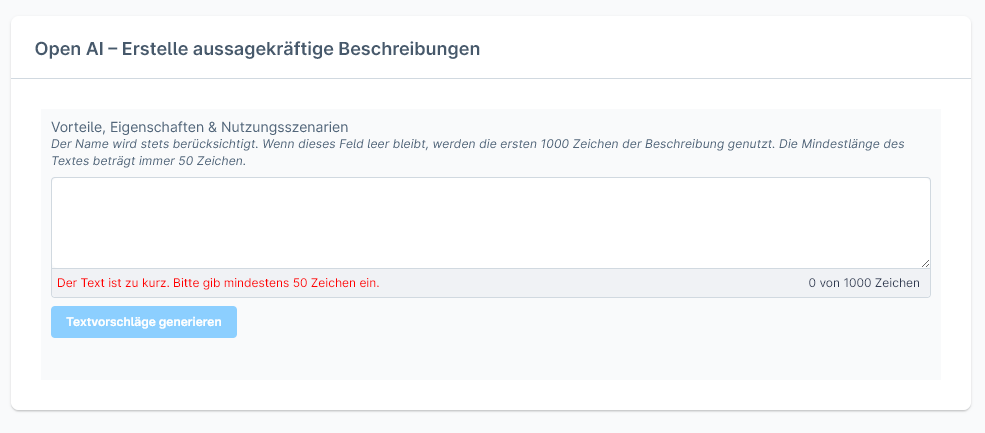
- If no description is available, please enter a text of 50-1000 characters. This will be used to create the description.
AI-generated text in free-text fields (Custom Fields): Product and category pages (Prompts Plus)
Premium function: This function requires the in-app purchase „Prompts Plus“. Without an active IAP, the box is hidden.
On the product and category pages, the „Free-text fields“ tab features a box that allows AI-generated text to be entered directly into text-enabled custom fields. Using bulk editing, custom fields can also be populated for several products or categories at the same time (select „Product Additional Field“ or „Category Additional Field“ in the bulk update, Prompts Plus IAP):
- Dropdown with all text-enabled custom fields of the product
- „Generate“ button to trigger AI text creation
- Status display during generation
Ideal for structured additional information such as care instructions, technical specifications or USPs, which are maintained in separate custom fields on the product or category page.
Category Description
- Go to Catalogues -> Categories and select your desired category.
- If there is a product description, this and the product title are used.
- If no description is available, please enter a text of 50-1000 characters. This will be used to create the description.
Bulk text editing
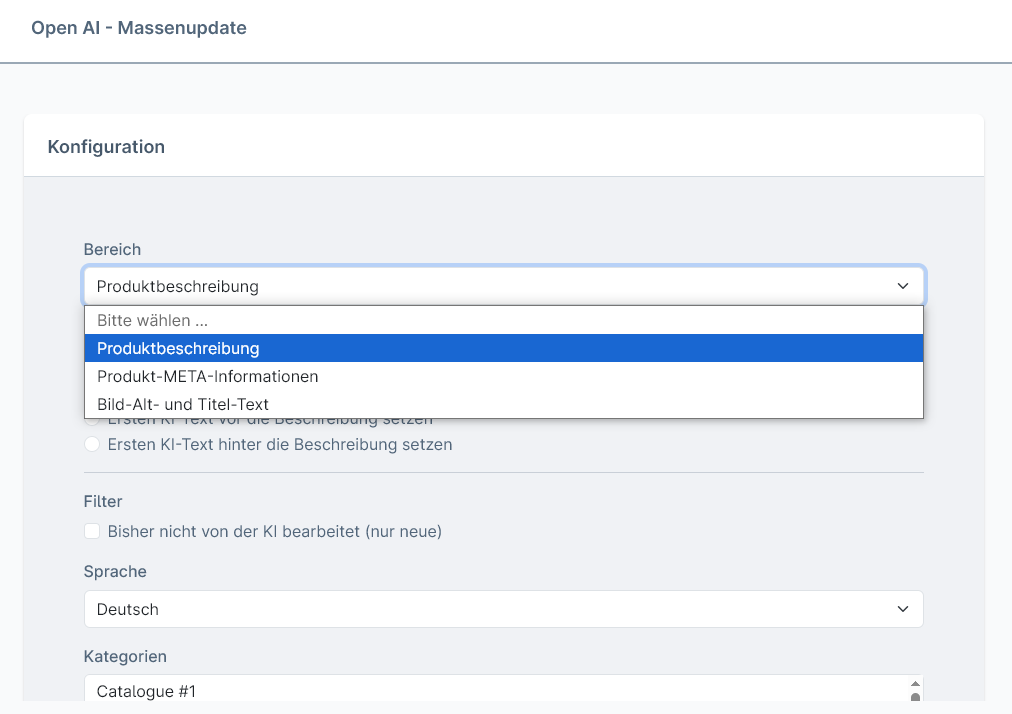
- Go to Catalogues -> Text AI – Bulk Update.
- The desired area to be edited can be selected in "Area".
- Product description
- Additional product field (Prompts Plus IAP)
- Additional category field (Prompts Plus IAP)
- Individual settings are available for the various areas
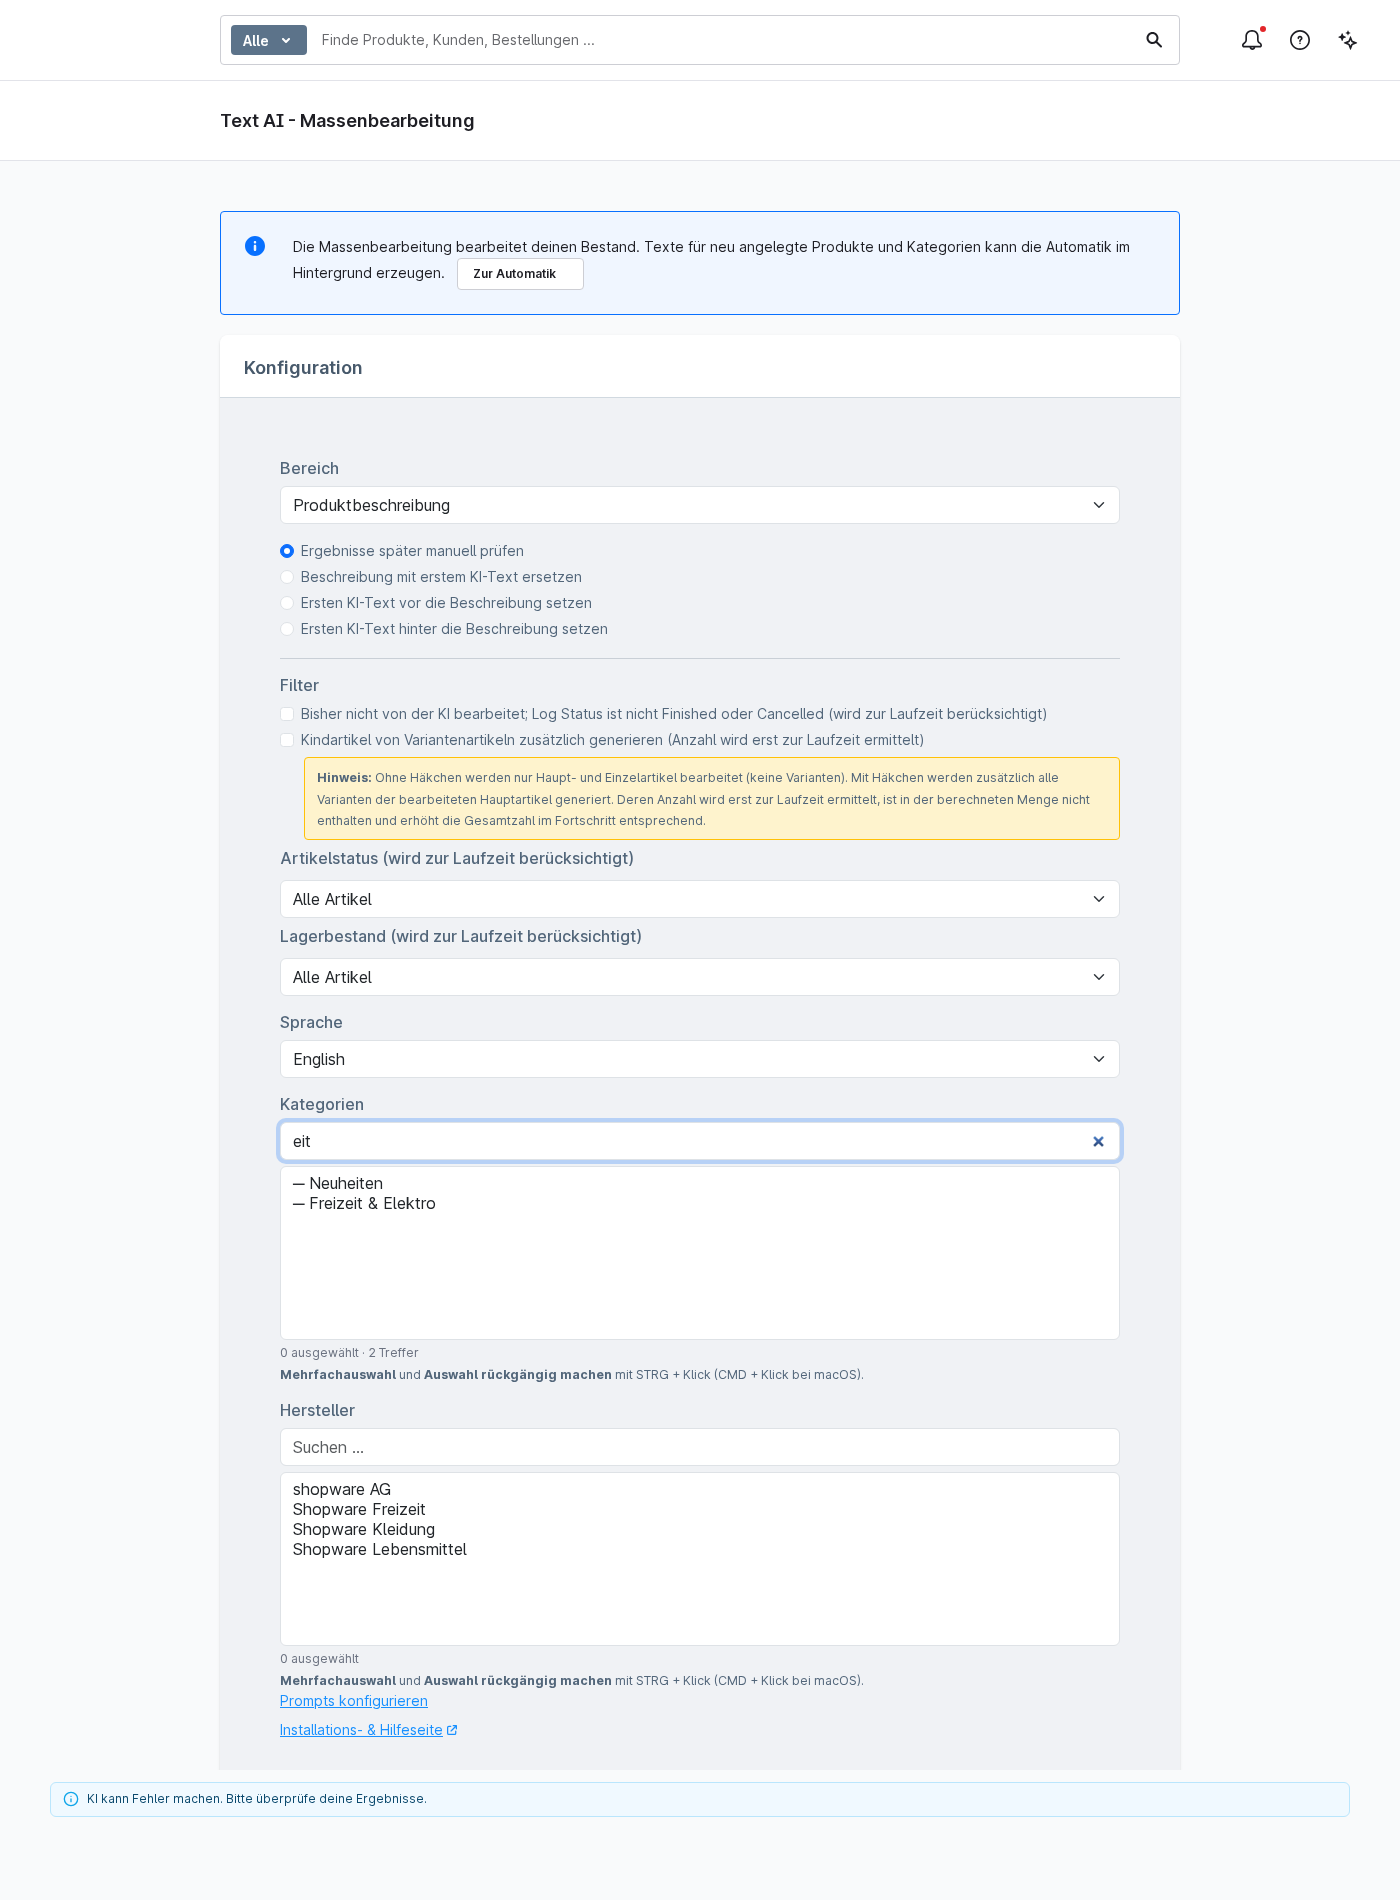
- Filter specifies whether something should be taken into account when selecting the areas to be processed, such as only processing entities that have not yet been processed by the AI
- Languages specifies which language is to be edited.
- Categories offers a category selection. This is used to narrow down the entities to be edited. Select all categories with Shift+click to edit all entities.
- The entities found, which are processed, are listed below.
- In the "Currently running bulk jobs" area, it is displayed whether a job is currently running
New feature on the category and manufacturer lists: a search box to help you find the right item more quickly.
Automatic
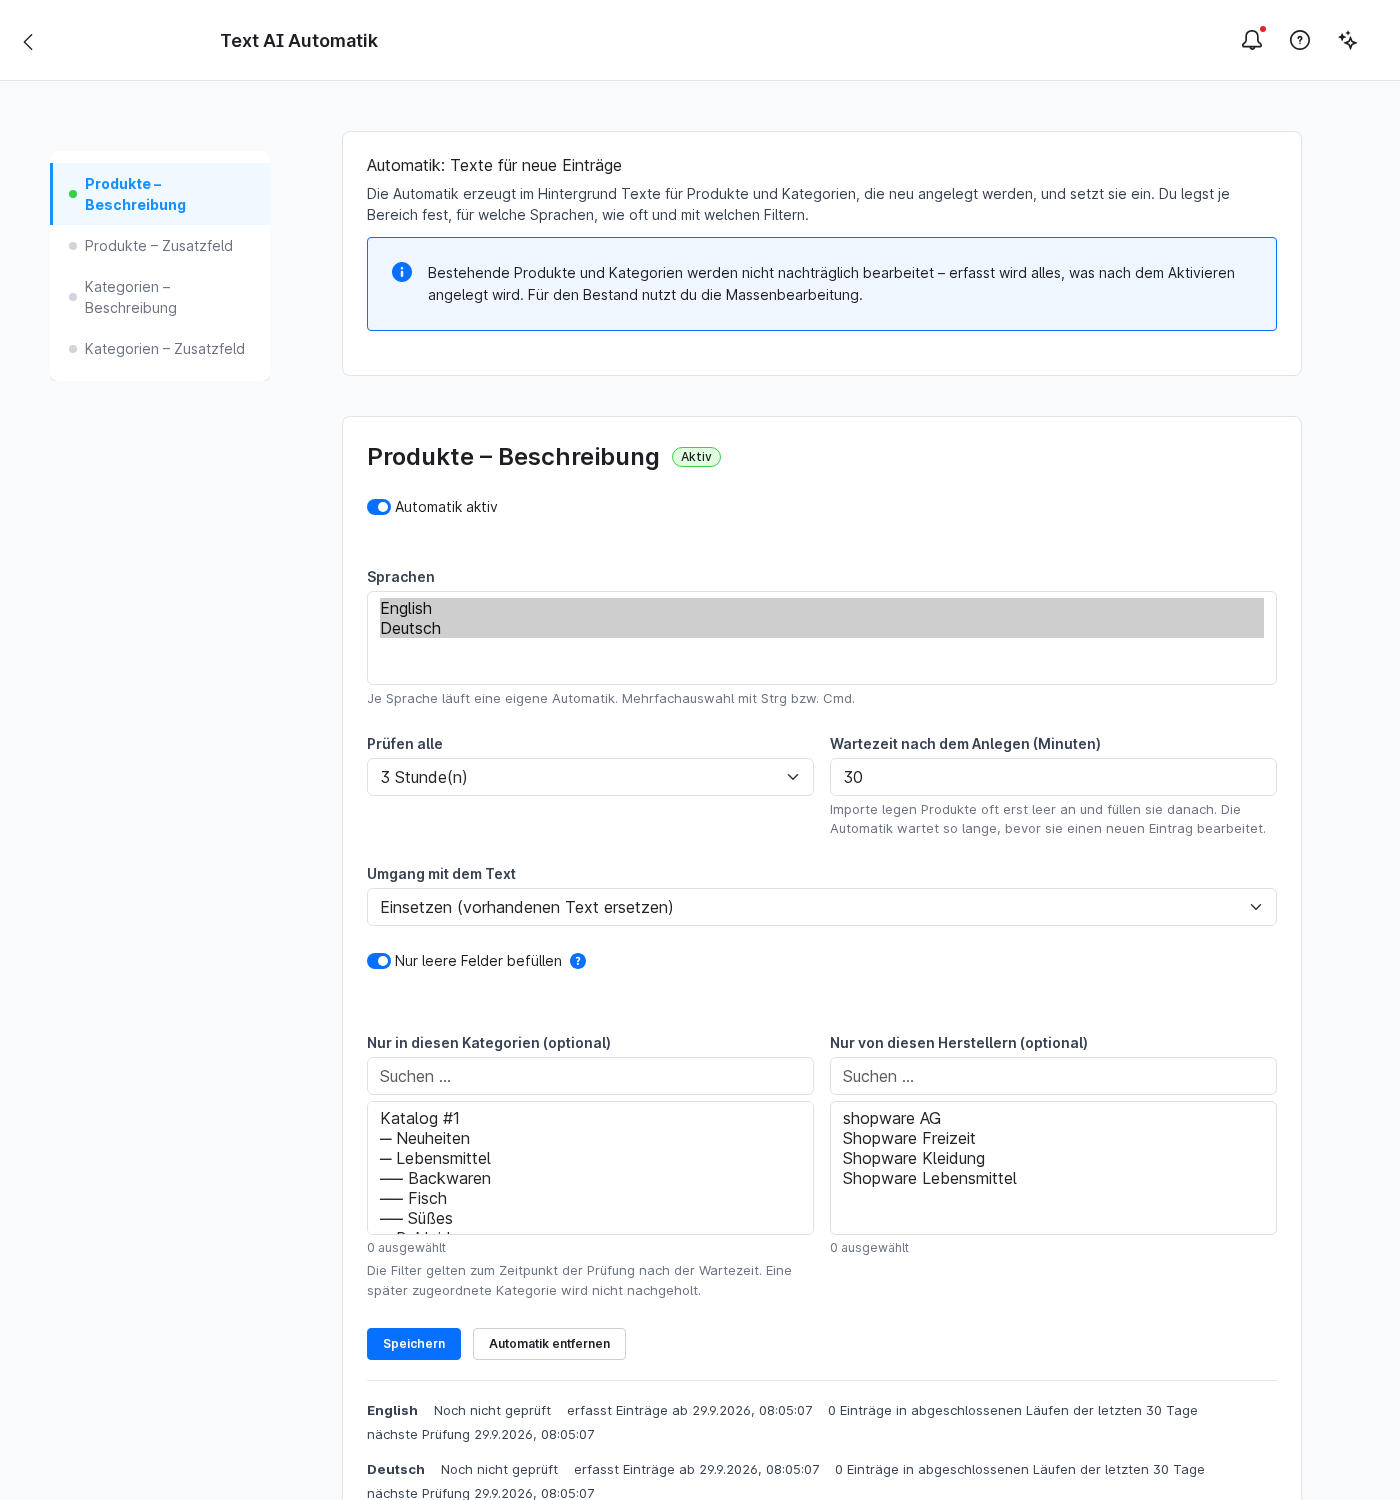
With the automated feature, Text AI generates text for newly created products and categories in the background and inserts it straight away. This means you no longer have to add text manually for every new data record. You can continue to edit your existing stock using the bulk edit function.
You’ll find the automatic feature listed as a separate entry, „Text AI Automatic“, in the Shopware admin panel. There’s a link leading directly to it from both the Prompts page and the bulk editing function.
The automatic feature is part of Prompts Plus (in-app purchase).
Areas
The content for which the automated system generates text depends on the extension. The following areas are available in Text AI:
- Products – Description
- Products – Additional field
- Categories – Description
- Categories – Additional field
You activate and configure each section individually.
Settings by area
For each area, you specify how the automatic function should work:
- Languages: You set up a separate automation for each language. You select multiple languages together.
- Check this: How often the automatic function checks for new entries (1, 3, 6 or 24 hours; default is 3 hours).
- Waiting time after creation (in minutes): Useful for imports where a record is first created empty and then populated. The automated process waits for the specified time before processing a new entry.
- How to handle the text (depending on the section): insert it or replace the existing text, include it only as a suggestion, or write it before or after the existing text.
- Fill in only the empty fields: Existing content remains unchanged; the system only adds what is still missing.
- Filter by categories and manufacturers (optional): Limits the records on which the automated process runs. The filters apply at the time of the check following the waiting period; any category assigned at a later date will not be included retrospectively.
Status and automatic pause
For each area, you can see at a glance whether the automatic function is enabled or disabled, or whether a run is currently in progress. The overview also shows the last run and the next test.
If your shop is unavailable at any point, or if the AI provider rejects the request (for example, due to insufficient credit or an invalid API key), the automated process will pause automatically. As soon as everything is back to normal, it will resume operation automatically.
Note on activation
When activated, the extension displays a warning: for every piece of text generated, tokens are used up and costs are incurred with the AI provider. The texts are used without any content checks; use is at your own risk. You should therefore check the generated content regularly.
Prompting
Overview
The Prompting module allows you to customise and modify AI text generation. It is possible to extend or replace the default prompts. A basic understanding of prompting is required, so this module is only recommended for „experts“.
Access to the prompting module
The prompting module can be accessed in two ways:
- About the settings: Go to Settings → Plugins → Text AI Prompts.
- About the mass update: In the mass update module, you will find a „Configure prompts“ link directly in the configuration view.
Available areas
This extension offers you the following features:
- Product description: Generating product descriptions
- Category description: Generating category texts
- Custom fields: AI-generated text for your own free-text fields on products and categories (Prompts Plus)
Configuration options per area
1. Additional prompt (optional)
- Special instructions can be added here, which are sent to the AI in addition to the standard system prompt.
2. Available variables
- The available variables are displayed for each area.
- Variables can be clicked directly to insert them into the additional prompt.
- The variables are automatically inserted at the cursor position in the text.
- Available variables depending on the area:
##targetLanguage##– Target language##productName##– Product name##productText##– Product description##productNumber##– Item number/MPN##productManufacturerName##– Manufacturer name##productManufacturerDescription##– Manufacturer's description##categoryName##– Category name##categoryText##– Category description##lengthFrom##/##lengthTo##– Text length specifications##keywords_amount##– Number of keywords##productProperties##- Technical product properties from Shopware (e.g. „Colour: Black, Material: Metal, Size: XL“). Only available if the „Include product properties“ toggle is active.##productCategories##- Product categories from Shopware (e.g. „Lighting, ceiling lights, LED“). Only available if the „Include product categories“ toggle is active. Helps the AI model to understand the product type and avoids hallucinations with unclear product names.##productImageMeta##- Title and alt texts of the product images (e.g. „Black ceiling light front view (alt: modern LED ceiling light)“). Only available if the „Include product image information“ toggle is active.
3. AI model selection
- You can select the AI model for text generation.
- Different models have different strengths and costs:
- GPT-5.5: Latest top model, best quality for complex tasks
- GPT-5 Mini: Fast and cost-effective, ideal for large volumes
- GPT-5: Balanced performance and quality
- GPT-5 Nano: Compact model for simple tasks
- GPT-4.1 series: Older models, still available
4. System prompt settings
- The standard system prompt contains the basic instructions for the AI.
- Option „Disable default system prompt“: can be used if you want to take complete control. Please only activate if you are familiar with prompting.
- The current system prompt is displayed for transparency.
5. toggle settings
- In the prompt settings (Settings → Extensions → Text AI Prompts), there are three toggles per prompt type to control the context:
- Include product features - controls whether
##productProperties##is filled with data. - Include product categories - controls whether
##productCategories##is filled with data. - Include product image information - controls whether
##productImageMeta##is filled with data. - All toggles are activated by default. Deactivating them saves token costs, but reduces the context for the AI.
Important note: The variables are automatically hidden if the respective product has no suitable data (e.g. no category assigned). The ##IF_variableName##...##ENDIF_variableName##-blocks in the system prompt are then removed.
Important information for prompting
Caution when adjusting prompts:
- Prompts should only be adapted if you are familiar with prompting.
- All adjustments are made at your own risk.
- Test changes first in single mode or in mass editing with a few elements.
- The prompt that was actually sent can be checked in the logging module in the detailed view.
Best practices for your own prompts
- Be specific: The more precise your instructions, the better the result.
- Use variables: Use the available variables for dynamic content.
- Test step by step: Start with small changes and test the results.
- Examples are helpful: Give the AI examples of the desired style.
- Note the length specifications: Use the length variables for precise text lengths.
Examples of additional prompts
For product descriptions:
Write in an enthusiastic tone and use bullet points for the most important features. Start with a compelling introductory sentence that addresses the main problem that ##productName## solves.For category descriptions:
Structure the description in 3 paragraphs: 1. Introduction to the category 2. Main advantages of the products in this category 3. Call to action to browseLogging and control
After the text has been generated, it can be checked in the logging module:
- Which prompt was actually sent to the AI.
- How the variables were replaced.
- What result was generated.
This helps you to continuously optimise your prompts.
Tips for troubleshooting
- Texts that are too short/long: Adjust the length specifications in the plugin configuration.
- Wrong tone: Add specific sound instructions in the additional prompt.
- Missing information: Ensure that all required product data is maintained.
- Inconsistent results: Use more specific instructions or change the model.
Custom fields as prompt variables (Prompts Plus)
Premium function: Variables are only replaced by the corresponding custom field values if the „Prompts Plus“ in-app purchase is active.
Within prompts, your own custom fields from products, categories and properties can be used as variables. When generating, the AI automatically replaces these placeholders with the corresponding values:
##productCustomField_##– Value of a product custom field (<name>= technical name of the custom field)##categoryCustomField_##– Value of a category custom field##propertyCustomField_##– Value of a property custom field
Example:
„Write a product description focussing on ##productCustomField_care instructions## and ##productCustomField_materials##.“
Without active Prompts Plus IAP, the placeholders remain unchanged in the generated text and are not replaced.
Text AI logs and data
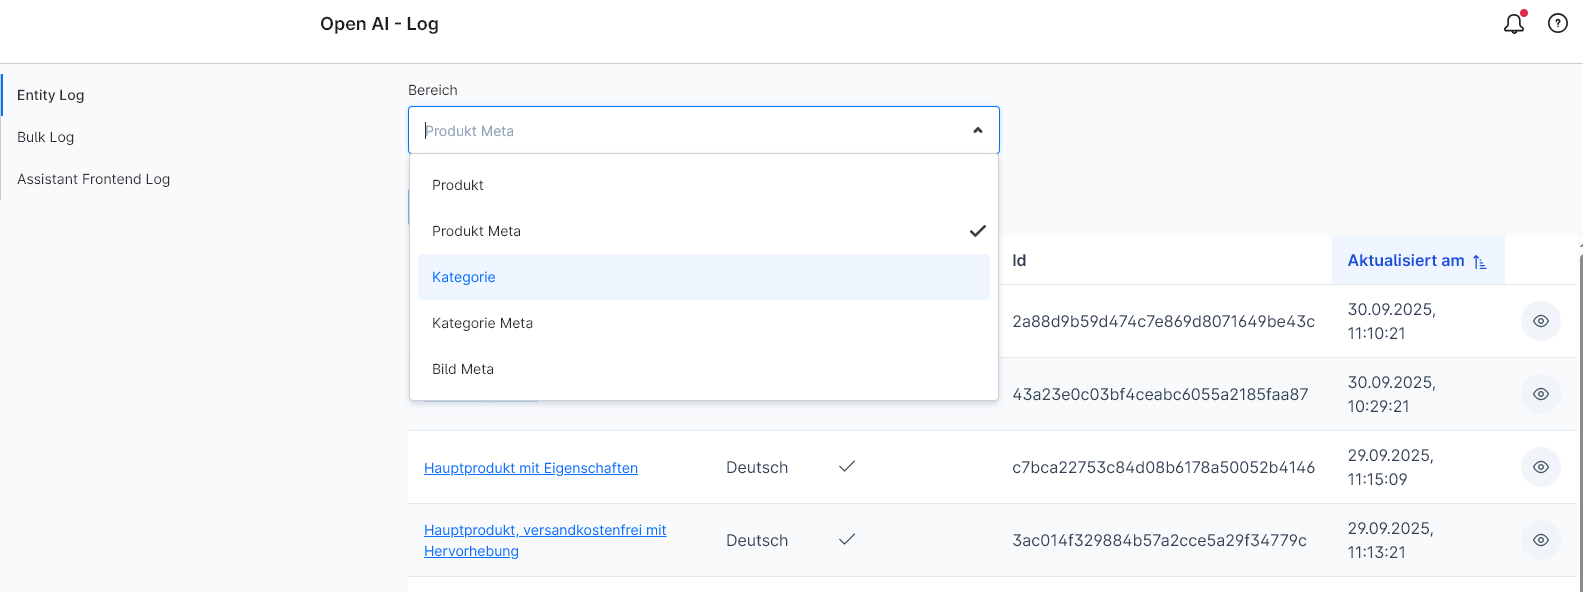
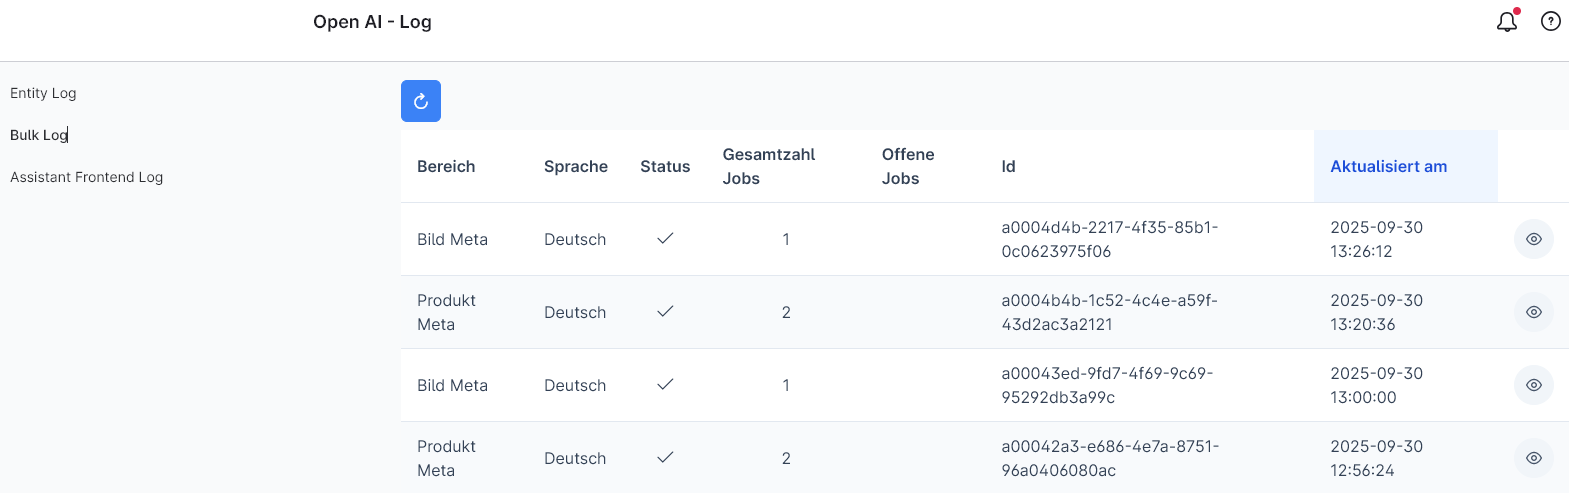
The log module records every job that has run for each individual area. If a job fails, the log is the first place to check.
You can find the logs under ‘Catalogues’ in the extension’s log section (Text AI – Logs and Data).
Entity Log
The individual entities that are processed by the AI are entered here and sorted by area.
Bulk Log
The bulk log jobs are entered here.
In-app purchases
Prompts Plus
Some of the features are part of the Prompts Plus in-app purchase. This unlocks:
- AI-generated text in custom fields for products and categories
- Custom fields as variables in your own prompts
- The automatic text generation feature for newly created products and categories
Product and category descriptions (created individually or via bulk editing) can also be generated without Prompts Plus.
You can purchase Prompts Plus directly from the Shopware Store via the extension. Once purchased, the additional features are available straight away without any further setup.
FAQs
Text AI: General Questions
The OpenAI account can be accessed via this link: https://platform.openai.com/ .
Here you will find the management of the credit, limitation and the API keys, which are necessary for the extension!
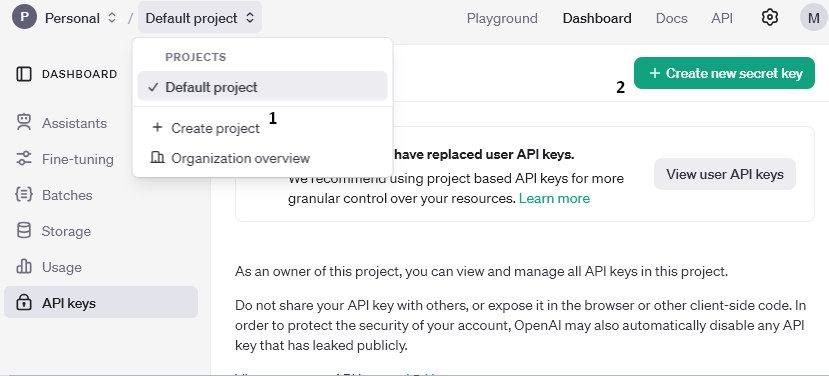
- A new project must be created first.
- A new API key can be created here and assigned to a project.
This key can be entered in the configuration of the extension.
Credits are required for the OpenAI API to function properly. As with other services, this is a "prepaid" method. You top up the credits and these are automatically "spent" as soon as the extension is used and a request is sent.
To top up credits with OpenAI, a payment method must be set up via your own profile.
The payment methods can be found under: Organisation -> Billing. A new payment method can be added here via "add payment details". If this is done, credits will also be topped up.
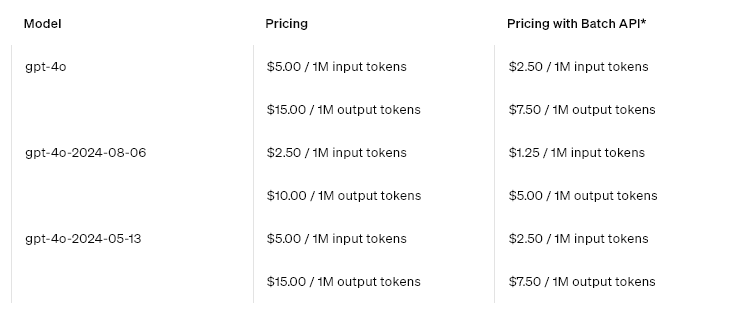
Credits are billed in dollars. OpenAI uses "tokens" - one token corresponds to approx. 4 characters.
Overview table from OpenAI https://openai.com/api/pricing/:
If, for example, only a certain budget of credits per month is available or for protection, limits can be set.
Monthly limits can be set via the profile: Organisation -> Limits, as well as an e-mail notification as soon as a certain amount is reached.
OpenAI provides usage in different "tiers". Initially, every user is in the "Free" tier, which severely restricts the use of the AI models to a few requests per minute. As soon as $5 has been paid for, these restrictions are greatly reduced and the extension can be used more efficiently.
Further information on the limitations can be obtained directly from OpenAI: https://platform.openai.com/docs/guides/rate-limits/usage-tiers?context=tier-free
Which current "tier" has been reached can be seen in the account here: https://platform.openai.com/settings/organization/limits
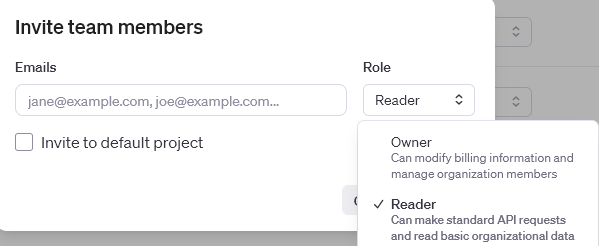
If there is interest in having someone else check settings and limits, members can be invited to join the organisation.
You can find the area here: https://platform.openai.com/settings/organization/members
A new person can be added here via "invite". There are two role options to choose from, here you can specify whether the new member can only view certain data or whether they can contribute to the organisation. As the first option is quite limited and certain tasks cannot be assigned, it is advisable to assign the "Owner" option.
For technical reasons, the extension only works on the domain for which it was purchased.
Staging and test environments are not supported.
We recommend that you always use the latest model.
For cost reasons, the predecessor model can also be used.
What is reasoning?
Reasoning is a function that instructs the AI model to go through a „thought process“ to avoid hallucinations and increase comprehensibility before giving an answer.
Reasoning from the ChatGPT5.1 model:
Since the ChatGPT5.1 model, OpenAI has offered reasoning that has significantly improved response times and the quality of responses.
No, the extension works even without Prompts Plus. You can generate product and category descriptions without Prompts Plus. Prompts Plus also enables AI-generated text in custom fields and the automatic text generation feature for newly created products and categories.
Support
If you have any questions or problems, please do not hesitate to contact us:
- Support request: biloba-it.de/shopware-plugin-support
- e-mail: support@biloba-it.de
- Telephone: +49 (0) 711 13633800
 German
  English