
Don’t miss out on any new features
Plugin news, updates and practical Shopware tips. Once a month.
Installation instructions
Install the extension via the extension area.
Uninstallation: important order of steps
If you are using Auto Translation Pro alongside other extensions from the series (Multi-Area, Bulk, Multi-Area Bulk, Lexicon or Language Pack), please ensure you follow this order when uninstalling them:
- First, disable all the extensions in question.
- Only then should you uninstall the add-ons (Multiple Languages, Bulk, Multiple Languages Bulk, Lexicon, Language Pack) before uninstalling the core Auto Translation Pro plugin.
- Only use the „Cancel and remove“ option once all extensions have been disabled and uninstalled.
Important to know: Shopware’s „Cancel and Remove“ function does not check whether an extension is still active, and deletes the files regardless. If the extension is still installed or active, the shop may subsequently crash in both the frontend and backend, displaying a 500 error. If you deactivate and uninstall the extensions beforehand in the order listed above, this will not happen.
API key
Google Translate API
- Go to https://console.cloud.google.com/ .
- Create a new project with your account.
- Enter the name of the project and click on "Create".
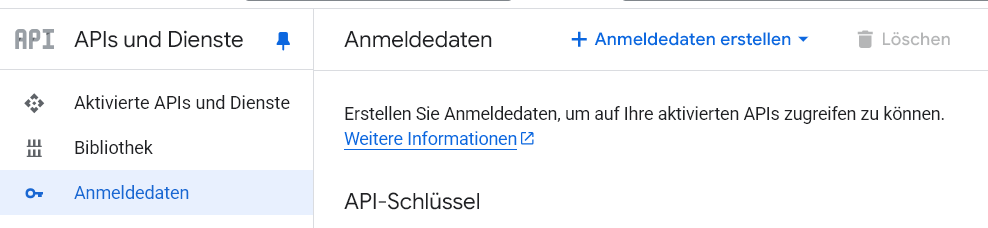
- Open the new project and go to API & Services.
- Activate API and services.
- Search for "Cloud Translation API" in the list and activate it.
- Now create a new Google Translate API key via "Create credentials" and enter it in the settings of the Shopware extension.
DeepL API
- Go to https://www.deepl.com/en/login
- Create an account or log in.
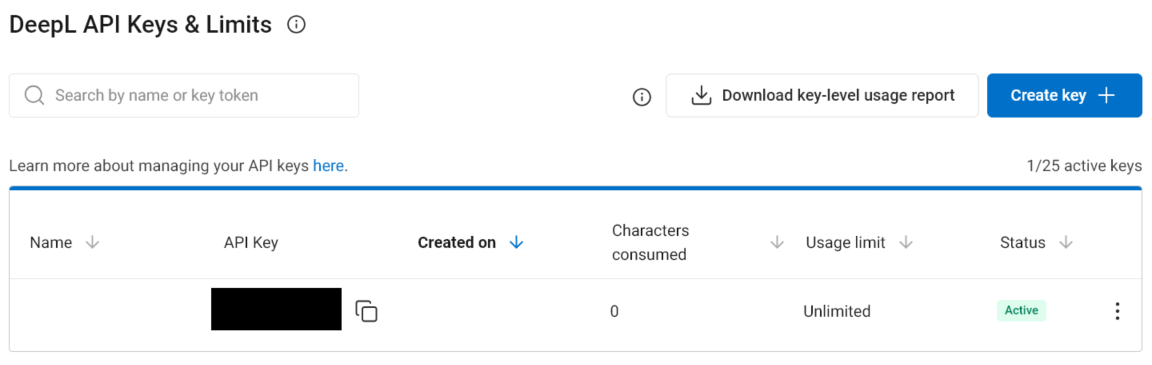
- Go to the "API Keys & Limits" section
- Create a new "key" and copy the key.
- Add the key to the settings of the Shopware extension.
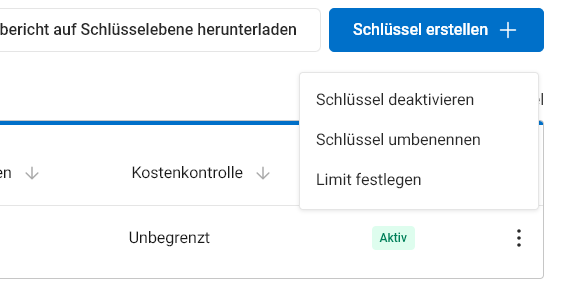
- We recommend activating cost control so that no unnecessary costs are incurred in the event of an unexpected error.
OpenAI API key
- Go to https://platform.openai.com/.
- Log in.
- Create a new project.
- Go to your profile and go to the "API keys" section https://platform.openai.com/settings/organization/api-keys.
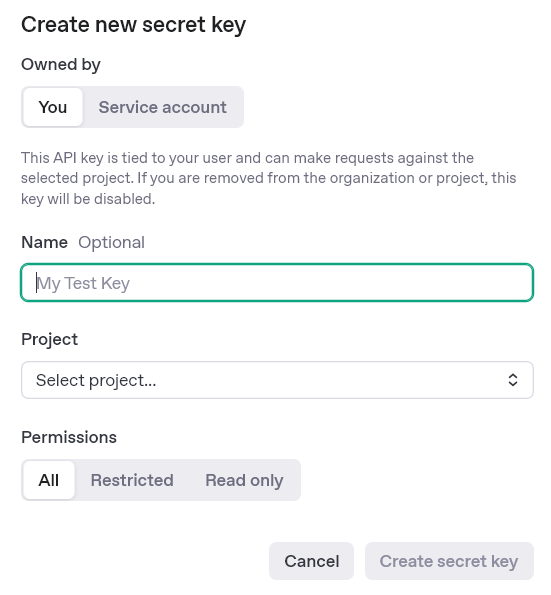
- Create a new API key via "Create new secret key".
- Top up credit so that the OpenAI API works. https://platform.openai.com/settings/organization/billing/overview
- Optional: We recommend that a usage limit is set so that no unnecessary costs are incurred in the event of an error https://platform.openai.com/settings/organization/limits
Mistral API key
- Go to https://console.mistral.ai/
- Create an account or log in
- Create API key and enter in Shopware extension
- Top up credit
- Note: European provider (GDPR-compliant)
Claude (Anthropic) API Key
- Go to https://console.anthropic.com/
- Create an account or log in
- Create and enter API key
- Top up credit under „Plans & Billing“
- Optional: Set usage limit under „Usage Limits“
Google Gemini API Key
- Go to https://aistudio.google.com/apikey
- Create and enter API key
- Note: Free-Tier has limited requests per day
Setting up the extension in Shopware
API settings
- Google API key: If Google Translate is to be used, enter the key here
- DeepL API key: If DeepL API key is to be used, enter the key here
- OpenAI API key: If OpenAI API key is to be used, enter the key here
- Mistral API key: If Mistral API key is to be used, enter the key here
- Claude API key: If Claude API key is to be used, enter the key here
- Gemini API key: If Gemini API key is to be used, enter the key here
Setting the subscription type of DeepL
DeepL offers various API subscription types. The two important ones for the extension are
- DeepL API Free, offers up to 500,000 free characters per month
- DeepL API Pro, free number of characters, EUR 20 per 1,000,000 characters
Please note: the correct subscription type must be selected to match the DeepL API Plan.
Setting for the translation
Translatable HTML attributes, activates the translation of e.g. links or images.
Carry over images and element settings from the source language
An element of an experience world (or a category, product or landing page layout) consists of translatable text and non-translatable settings: the image, links, alignment, display mode, minimum height and others. Shopware stores both for each language. As long as a target language does not yet have its own version of the element, it inherits everything live from the source language. Once the plugin has translated the element, it has its own language version, and changes to the image or settings in the source language are no longer automatically reflected there.
In the „Translation settings“ section, you’ll find four options for this, one for each of the following: Worlds of Experience, Category layouts, Product layouts and Landing pages:
Include images and other untranslatable element settings from the source language
- Off (default): previous behaviour. The target language retains its own images and settings. This is correct if you deliberately use different images for each language, for example in the case of text within an image.
- To: For every translation (Translate, Translate All, All Languages, Console, Bulk Translation), images and all other non-translatable settings for the elements are carried over from the source language to the target language. Texts that have already been translated are retained. Any images maintained differently in the target language are overwritten in the process.
Important to know
- New language versions are never created. Any element that still inherits in the target language continues to do so, meaning that Shopware’s inheritance structure remains intact.
- In the case of ‘Erlebniswelten’, this also applies to elements that do not contain any text at all, such as elements consisting solely of images. These are not translated, but simply copied, at no cost to the translation service and without an entry in the translation log.
- Text fields recognised by the plugin are considered translatable: headings, body text, button labels, alt text and other fields within the supported elements. A text field belonging to an unknown third-party element is treated as a setting and, if the option is enabled, will also be taken from the source language. For such elements, test the option on a test environment.
- This option will take effect during the next translation run. To update existing experience worlds, simply select „Translate“ or „All Languages“ for the relevant experience world. In a bulk translation run (under „Experience Worlds“), image-only elements are always updated; text elements that have already been translated are only updated if the ‘Translate previously translated elements again’ box is ticked.
- Elements whose field is excluded from translation in the plugin settings will also be excluded from being applied.
DeepL-specific settings
- Tonal adjustment
- Here you can set the tone DeepL should use for the translation. Informal or formal tone.
- DeepL translation context
- Here, specific contexts can be transferred to DeepL for translation.
- Example: „This is a text about hunting, hunting clothing and hunting equipment.“.
- This context helps to better understand technical terminology when translating.
DeepL Translation model
In the plugin configuration (Extensions → Auto Translation Pro → Configure), you will find the new option in the DeepL area DeepL Translation model with two values:
- Best quality (next-gen, recommended) - uses the new DeepL next-gen models (LLM-based) for higher translation quality. This is the default setting.
- Classic (fast) - uses the previous DeepL models. Slightly faster response times and unchanged character quota consumption behaviour.
When to choose which value?
- Next-Gen (Standard): the best choice in most cases. Better translation quality, more contextualised.
- Classic: if maximum speed is more important than the last quality level or if you notice that the quota is being used up faster than desired.
DeepL Free: If you use the DeepL free plan and the next-gen model is not (yet) supported on your endpoint, the plugin automatically falls back to the classic model. No intervention is necessary - the translation will still run. You can therefore safely leave the option at the default setting.
Existing installations: After an update to this version, the next-gen model is automatically used without you having to save the plugin configuration again.
Translate links
Translates a link on the page and determines whether there is an alternative link in another language in the sales channel.
The following user-defined fields are ignored during translation
A selection of custom fields that can be ignored during translation.
The following product fields are ignored during translation
Here you will find a selection of product fields that can be ignored during translation. Do not select mandatory fields such as "Name". For technical reasons, translations can no longer be saved once these fields have been selected.
OpenAI specific settings
- Temperature
- Controls randomness: Lower values (<0.5) make spending more focussed and deterministic.
- Higher values (0.5-2.0) make expenditure more creative and diverse.
- Note: not supported in GTP-5 models.
- Optional additional user prompt
- Additional instructions to extend the translation prompt, leave blank to use standard prompt.
Mistral specific settings
- Model: Mistral Large or Mistral Small
- Temperature: 0.0-2.0
- Optional additional user prompt
Claude specific settings
- Model: Claude Opus 4 (strongest), Claude Sonnet 4 (balanced), Claude Haiku 3.5 (fast & favourable)
- Temperature: 0.0-1.0 (Claude max. 1.0)
- Optional additional user prompt
Gemini specific settings
- Model: Gemini 2.5 Pro, Gemini 2.5 Flash, Gemini 2.0 Flash
- Temperature: 0.0-2.0
- Optional additional user prompt
Check API login information
The API keys entered above can be checked here after they have been saved.
Languages
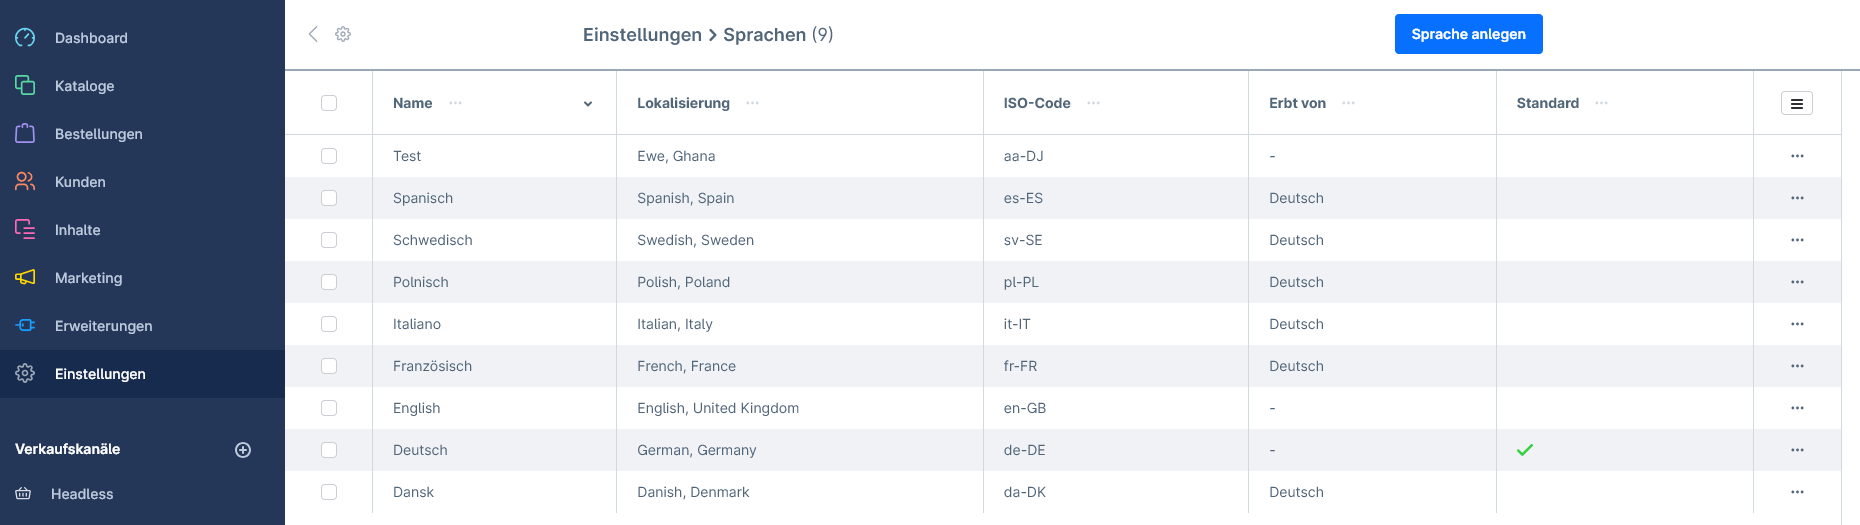
Settings -> Shop -> Languages
Select an existing language or create a new language.
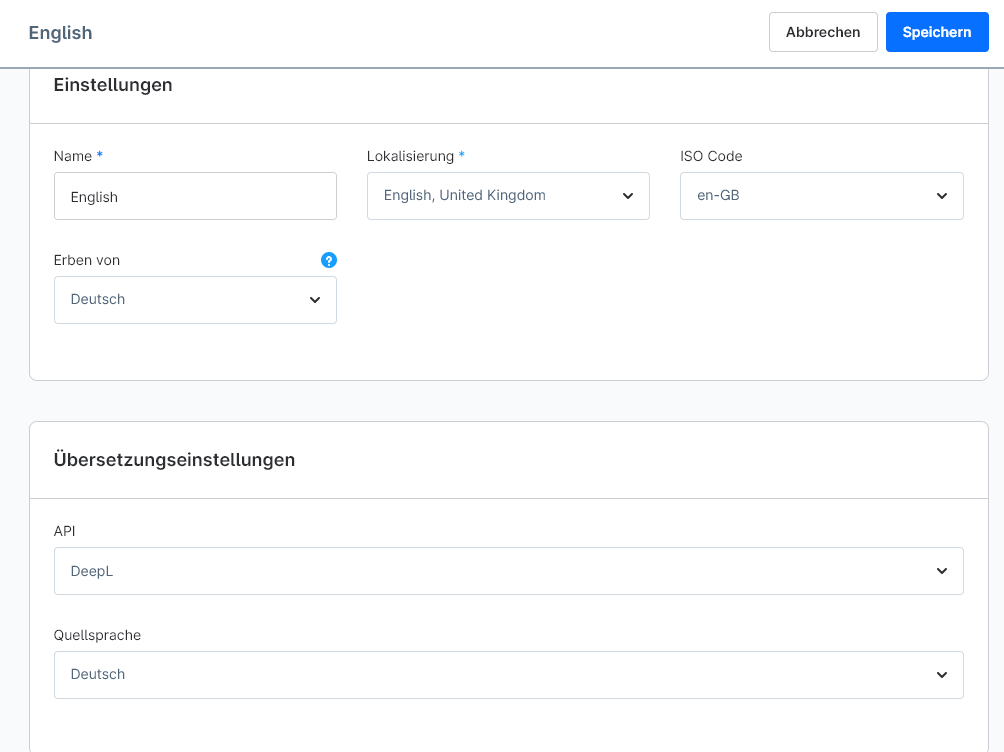
Choose a name, create the localisation and the ISO code of the language.
"Inherit from" - indicates which language this language inherits from.
After saving, the translation settings can be made:
- API Choose between Google, DeepL, OpenAI, Mistral, Claude or Gemini.
- Source language specifies the language from which the translation is made. The main language of the shop should be used here.
- If you select a language other than the default language when selecting the source language, make sure that all mandatory fields are filled in. Otherwise the translations cannot be saved for technical reasons.
With the main extension English only available. Other languages can be added with the Language package be set.
Use of the extension, without bulk extension
Product
- To translate a product, open the product in Catalogues->Products.
- Change the language in the bar at the top to the desired language.
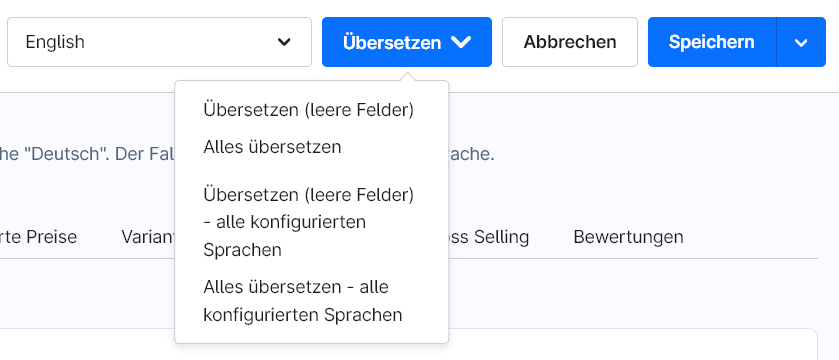
- Select „Translate“; one of the four options can be selected from the drop-down menu:
- Translate (empty fields)
- Translate everything
- Translate (empty fields) - all configured languages
- Translate everything – all configured languages
Categories (More areas)
- To translate a category, open the category in Catalogues->Categories.
- Change the language in the bar at the top to the desired language.
- Select „Translate“; one of the four options can be selected from the drop-down menu:
- Translate (empty fields)
- Translate everything
- Translate (empty fields) - all configured languages
- Translate everything – all configured languages
Manufacturer (More areas)
- To translate a manufacturer, open the manufacturer in Catalogues->Manufacturers.
- Change the language in the bar at the top to the desired language.
- Select „Translate“; one of the four options can be selected from the drop-down menu:
- Translate (empty fields)
- Translate everything
- Translate (empty fields) - all configured languages
- Translate everything – all configured languages
E-mail templates (More areas)
- To translate an email template, open the email template in Settings-> Shop->Email templates.
- Change the language in the bar at the top to the desired language.
- Select „Translate“; one of the four options can be selected from the drop-down menu:
- Translate (empty fields)
- Translate everything
- Translate (empty fields) - all configured languages
- Translate everything – all configured languages
Dynamic product groups (more areas)
- To translate a dynamic product group, open the dynamic product groups in Catalogues->dynamic product groups.
- Change the language in the bar at the top to the desired language.
- Select „Translate“; one of the four options can be selected from the drop-down menu:
- Translate (empty fields)
- Translate everything
- Translate (empty fields) - all configured languages
- Translate everything – all configured languages
Worlds of experience (More areas)
- To translate a world of experience, open the worlds of experience in Content->Worlds of Experience.
- Change the language in the bar at the top to the desired language.
- Select „Translate“; one of the four options can be selected from the drop-down menu:
- Translate (empty fields)
- Translate everything
- Translate (empty fields) - all configured languages
- Translate everything – all configured languages
In addition to the standard fields, content from compatible third-party extensions is also automatically translated, e.g. the FAQ entries (titles and text) in the Moorl Foundation accordion element – even when this is used in categories or landing pages.
Use of the extension, with the bulk extension
Product
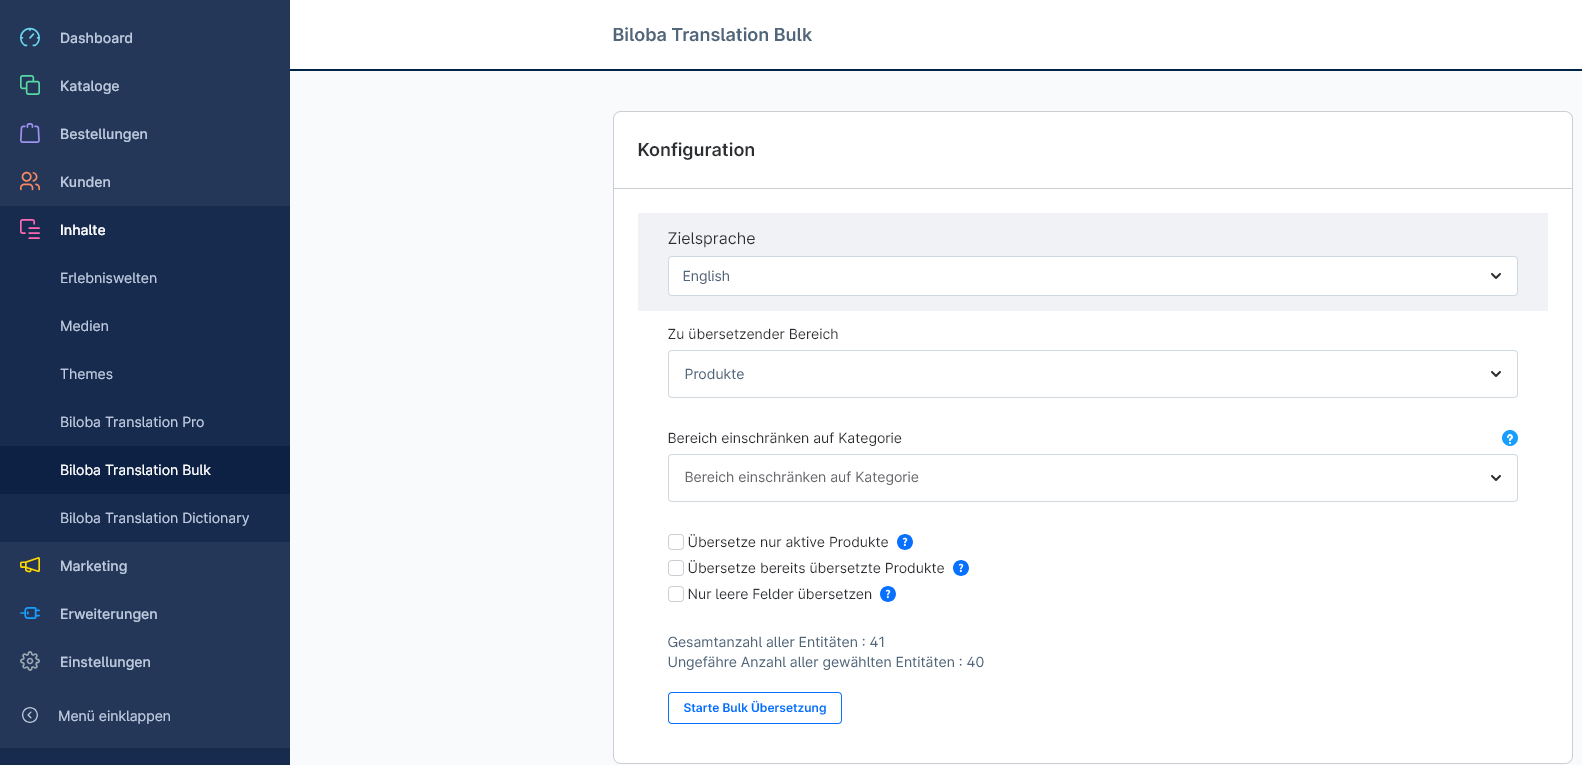
- Open the bulk menu under Contents -> Biloba Translation Pro Bulk
- Select the target language
- Select the area you want to translate, some areas are only available with the More areas bulk Extension available
- Each area has its own settings, most of which offer the following points:
- Translate only active "...": Select the option to translate only active entities.
- Translate already translated "...": Select this option if you want to start the translation a second time and translate all "old" entities and new entities again.
- Translate only empty fields: translates only empty fields in a similar way to "Single translation".
Automatic translation on saving (from version 4.4.0, Shopware 6.7 only)
From version 4.4.0 onwards (Shopware 6.7 line only), you can trigger the translation directly when saving a product in the new „Automatic Translation“ tab of the Bulk extension – without having to run a manual translation via the Bulk menu. This feature is disabled by default after installation or an update and must be explicitly enabled.
- Automatic translation on saving: enables or disables this feature (default: disabled).
- Target languages: can only be selected from the languages you have configured.
- Areas: Products and cross-selling.
- Translate empty fields only: existing translations will not be overwritten during the automatic run.
Translation via the console (cron job)
As well as via the admin panel, translations can also be initiated via the console, for example using a cron job. You can access all the commands in the shop directory using bin/console as (on most servers, as the web server user, e.g. sudo -u www-data php bin/console ...). bin/console --help shows you all the options, complete with examples.
What types of text can I translate?
bin/console biloba:intl_translation:entitiesLists every translatable entity along with its fields. With the „More Sections“ extension, categories, manufacturers, email templates, experience worlds and more are automatically included.
Which languages are available?
bin/console biloba:intl_translation:languagesDisplays all shop languages along with their ID, locale, the translation API specified under Settings → Languages, and the source language. Only languages with a configuration can be the target of a translation. Using the option --providers You can also see which language is supported by which API.
Translate a single entity
bin/console biloba:intl_translation:translate product 0189f1c0a3b57c5a9b2e6f3d4c8a1b2c --target en-GB
bin/console biloba:intl_translation:translate category 0189f1c0a3b57c5a9b2e6f3d4c8a1b2c --target de --target fr --all-fields
bin/console biloba:intl_translation:translate product 0189f1c0a3b57c5a9b2e6f3d4c8a1b2c --target all --dry-run--targetaccepts the language ID, the locale code (en-EN), the ISO code (de, only if unambiguous) or the language name.allTranslated into all configured languages. Multiple entries are permitted.- By default, only empty fields are translated, as with „Translate (empty fields)“ in the admin panel. With
--all-fieldsyou’ll also overwrite any existing translations. --dry-runshows you the fields and source code that would be sent without calling the API. Useful for checking before using up your quota.- Text snippets can only be translated using bulk translation (see below; requires the Bulk extension).
Runs initiated from the console appear in the translation log with the initiator „BilobaIntlTranslation-CLI“.
Bulk translation via the console (using the Bulk extension)
bin/console biloba:intl_translation:bulk product --target de-DE
bin/console biloba:intl_translation:bulk product category --target all --only-active
bin/console biloba:intl_translation:bulk product --target en-GB --category "Summer" --all-fields
bin/console biloba:intl_translation:bulk all --target all --dry-run
Launches the same bulk translation process as the Bulk module in the admin panel. Each filter in the admin form has a corresponding option:
| Admin form | Console |
| Area | Argument(s), e.g. product category CMS or all |
| Target language | --target (ID, locale, abbreviation, name, all) |
| Active items only (products, categories) | --only-active |
| Translate elements that have already been translated again | --already-translated |
| Translate empty fields only | Standard, --all-fields overwrites existing translations |
| Category (products only, including subcategories) | --category |
The sections available depend on the extensions you have installed („More Bulk Sections“; the ‘Blog’ and ‘Lexicon’ extensions automatically include their own sections). An ‘Unknown Section’ lists the valid names for you. --dry-run shows, for each area and language, how many items would be added to the queue.
Important, Message Worker: The command simply places the task in the Shopware queue, just as it does in the admin panel. The translation is handled by the Message Worker. Either messenger:consume async low_priority either as a permanent service, or the cron job calls it immediately after the bulk command:
*/30 * * * * cd /path/to/shop && flock -n /tmp/biloba-bulk.lock sh -c 'bin/console biloba:intl_translation:bulk product category --target all && bin/console messenger:consume async low_priority --time-limit=1500'If a bulk translation is still running for a particular area and language, the command skips that combination and displays a message (the exit code remains 0). Overlapping cron jobs therefore do not set anything twice.
If you also use the „More Areas“ or „More Areas Bulk“ extensions, their areas will automatically be available in the console commands of the main and bulk plugins, without any additional setup.
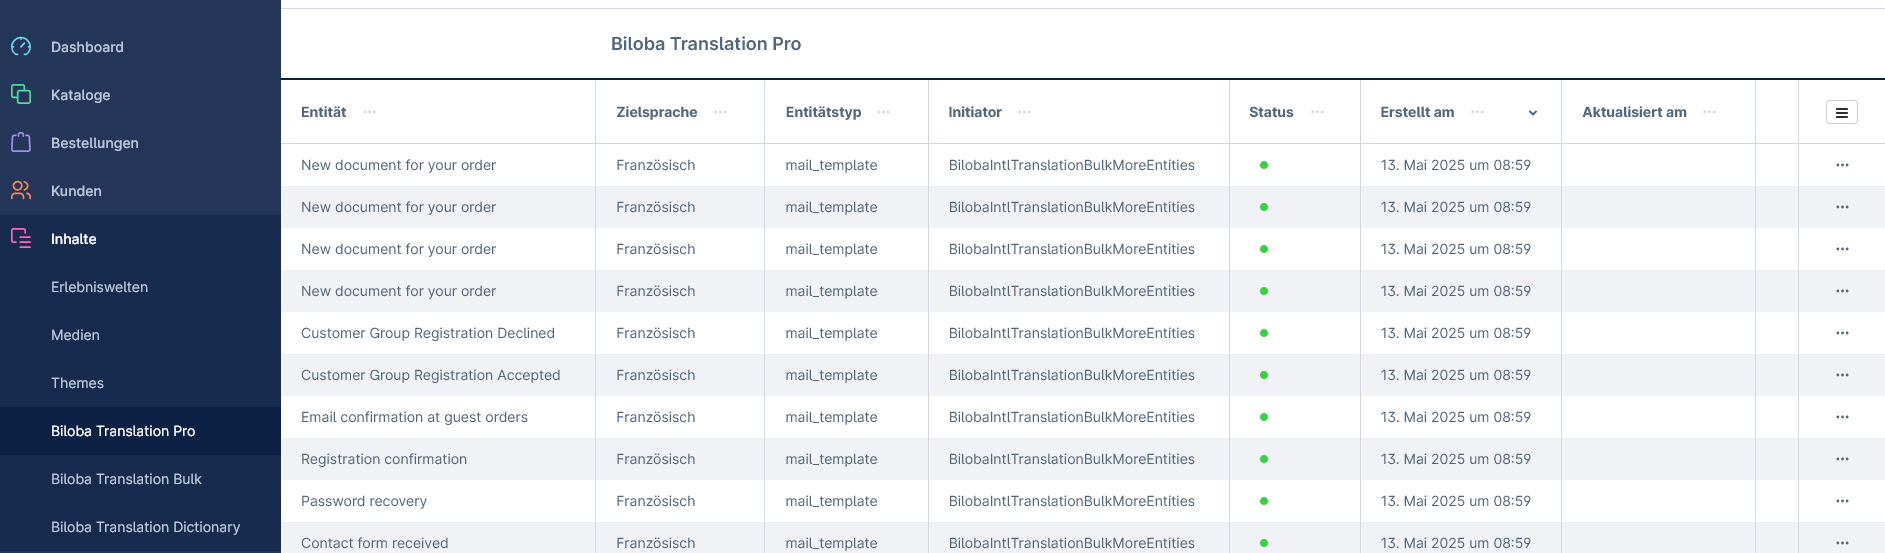
Biloba Translation Pro Log
Under Contents -> Translation Pro you will find a log for all translated entities
Biloba Auto Translation Pro Lexicon
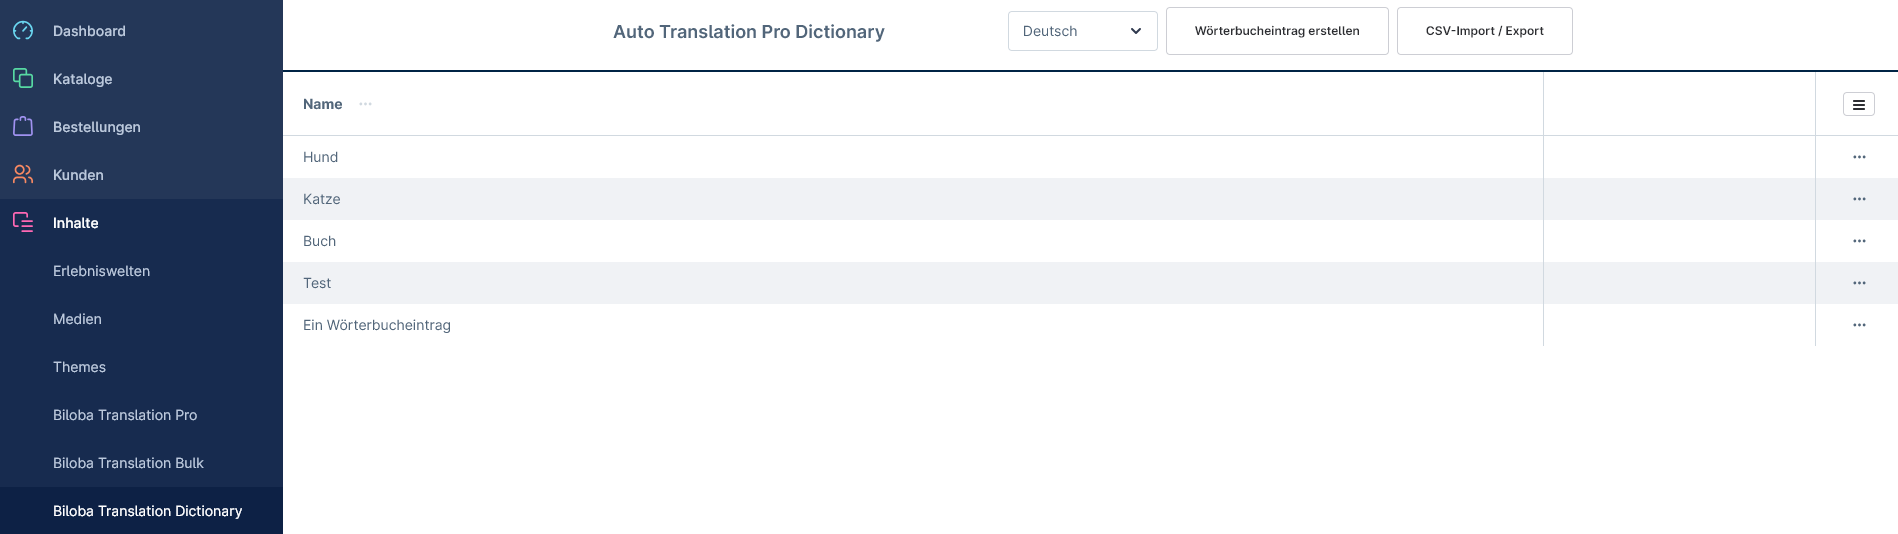
Under Contents -> Biloba Translation Pro Dictionary, fixed words can be set which are always translated in the same way.
- Open the Dictionary menu
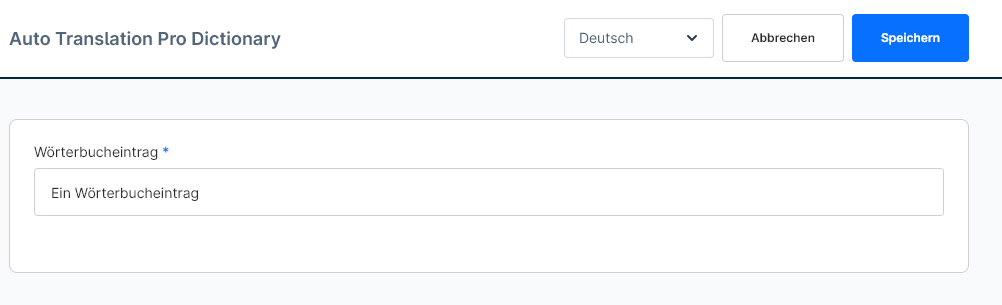
- Open a new "Dictionary entry"
- Create the word in the main system language
- Save the entry
- Change the language and enter the fixed word in this language into which you want to translate.
Native DeepL Glossary integration
Dictionary entries are now synchronised as native DeepL glossaries and used directly by DeepL during translation. This improves the translation quality, as DeepL can use the terms correctly in the language context instead of just adopting them unchanged.
New button „Synchronise DeepL glossary“ in the dictionary list in the admin area. This uploads all dictionary entries as glossaries to DeepL.
Important: After each change to dictionary entries, the glossary must be manually resynchronised using the button so that the changes take effect at DeepL.
For language pairs that are not supported by DeepL glossaries, as well as for other translation APIs (Google, OpenAI), the existing logic continues to apply.
Prerequisite: Auto Translation Pro (biloba/intl-translation) version 4.9.0 or higher.
CSV Import/Export
It is also possible to create the entries via CSV export / import.
To see what the CSV must look like, create the CSV as an export for an entry.
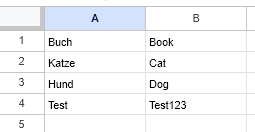
The CSV file must start with Semicolons be separated. In the 1st column the dictionary entry of the Default language be created. In the 2nd column the entry of the Target language stand. Existing entries are overwritten.
Example of entries in English with German as the main language
FAQs
Support
If you have any questions or problems, please do not hesitate to contact us:
- Support request: biloba-it.de/shopware-plugin-support
- e-mail: support@biloba-it.de
- Phone: +49 (0) 711 - 13633800
No solution found?
Describe your problem to us - we'll take a look at it and get back to you as soon as possible.
 German
  English