
Don’t miss out on any new features
Plugin news, updates and practical Shopware tips. Once a month.
Install extension
Install and activate the extension in your Shopware administration under Extensions.
How the plugin works
The plugin supports two different methods for tracking integration in your Shopware shop:
- Google Tag Manager (GTM)
The recommended and most flexible method. With Google Tag Manager, you can manage all tracking events centrally, add your own tags and expand tracking at any time, without having to make any changes to the shop’s code. The plugin provides you with a pre-configured GTM template for this purpose. - Google tag (gtag.js)
This method integrates Google Analytics 4 – and, optionally, Google Ads – directly via the gtag.js script, without using Tag Manager. It is suitable if you prefer a simple setup.
Important: Deactivate other Google Analytics integrations if you use this app.
Set up Google Tag Manager
Tag Manager account and container
- Log in to your Google Tag Manager account or create a new account.
- Create a new empty container for importing the default settings.
For advanced users: You can also use an existing container and merge it later. However, we recommend using a new container.
You can find help with Google Tag Manager here:
Google Tag Manager Support
Create a GTM template with our generator
Our generator creates the finished JSON import file for your GTM container.
Analytics only: Exclusively GA4. No Google Ads.
Ads only: Exclusively Google Ads conversion tracking. No GA4.
Tip: You can read the account ID and container ID directly from the URL when you are logged into GTM:tagmanager.google.com/#/accounts/[Account ID]/containers/[Container ID]/
Import template
Import the customised file in GTM under Management → Import container.
Fill in variables
Switch to the GTM area Variables and fill in the following constants (enter values):
- 1.0# Google Analytics - Tag ID
- 2.0# Google Ads - Conversion ID
- 2.1# Google Ads - Label ID
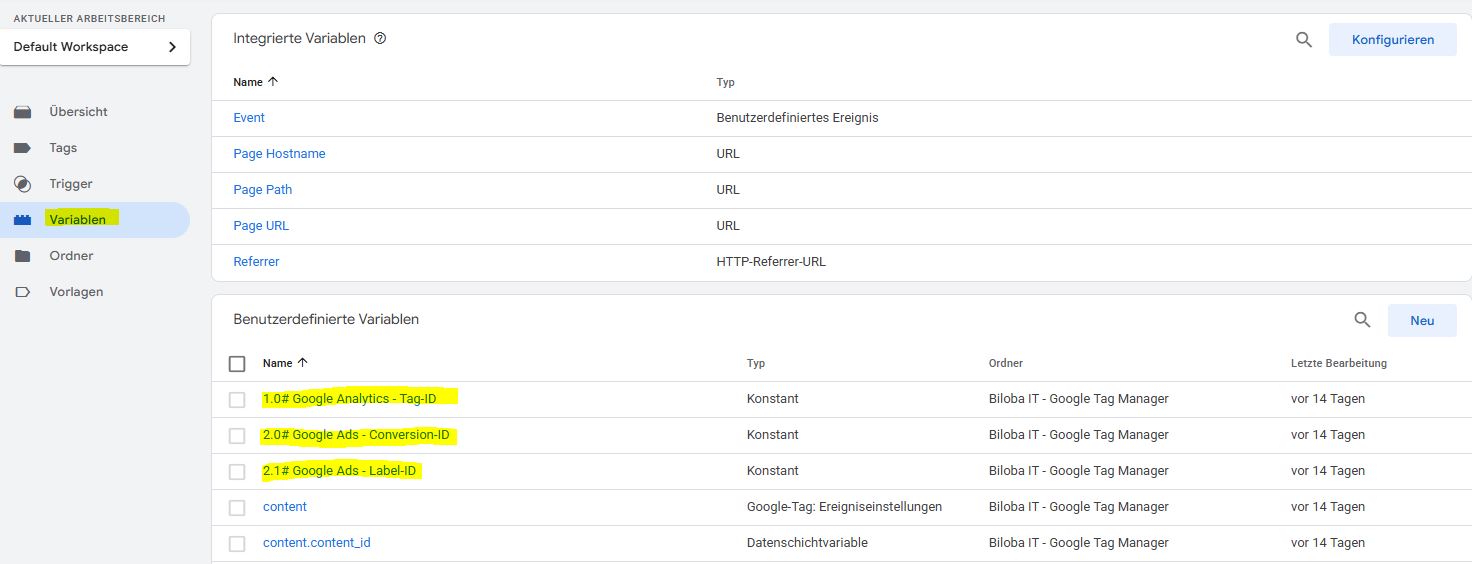
How to find the IDs:
Analytics: Create a property or go to your existing property in Google Analytics and navigate to Administration (bottom left) and then to "Data streams". Select the relevant data stream. You will find the GA4 ID at the top right (measurement ID). Google Help
Ads: Log in to Google Ads → Target project → Conversions → Summary. Open the desired conversion action (or create a new one) Under Tag setup, select the "Use Google Tag Manager" tab. There you will find the conversion ID and the conversion label.

Configure plugin in Shopware
Now switch to your Shopware backend and open the plugin configuration.
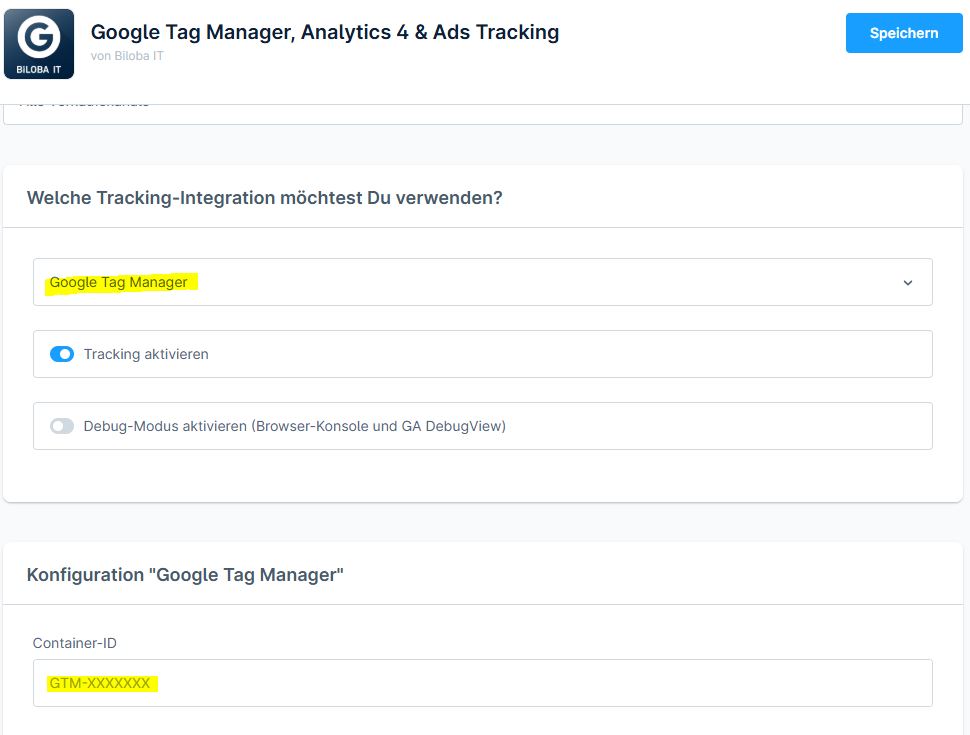
Under "Which tracking integration would you like to use?", select the option "Google Tag Manager".
Then enter your GTM ID (e.g. GTM-XXXXXXX) in the "Google Tag Manager Container ID" field.
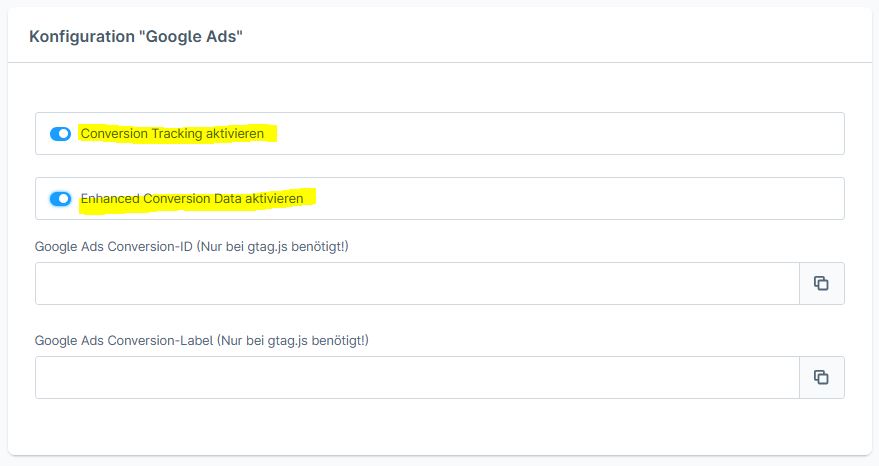
If you use google Ads Tracking, please also activate the option and, if applicable, Enhanced Conversion Data:
Save the configuration to activate the integration of the container in the shop.
Check and publish containers
Use the Preview function in Google Tag Manager ("View in preview") to test your container. Enter your shop URL and check whether all events such as product view, add-to-cart or purchase are triggered correctly. Make sure that no tracking takes place if cookie consent is rejected.
If everything works as desired, don't forget to publish the container Click on the top right of the GTM on Send → Publish. Only then will your tracking be active in the live shop.
Do you need some help?
Free fitting service: Book an appointment with our expert now
Configuration Google Analytics (gtag.js)
If you no Google Tag Manager you can alternatively work directly with the Google Analytics tracking code (gtag.js).
- Choose from "Which tracking integration would you like to use?" the option "Google Analytics (gtag.js)".
- Wear your Google Analytics 4 Measurement ID in the format G-XXXXXXXXXXXX in the corresponding field. You can find the ID in Analytics under Administration → Data streams
- Save the configuration.

With immediate effect, the plugin will handle tracking via the gtag.js code, including all supported e-commerce events such as product views, add-to-cart and purchase completion.
Hint: If you use the Google Tag Manager If you’re using it, you’ll need to maintain the GA ID there in the container. Not in the plugin.
Configuration Google Ads Tracking (gtag.js)
If you want to use Google Ads Conversion Tracking, without using the Google Tag Manager, you can set this up directly via the gtag.js tracking code.
- Choose from "Which tracking integration would you like to use?" the option "Google Analytics (gtag.js)".
- Activate the option in the plugin "Activate conversion tracking".
- Wear your Google Ads Conversion ID and the associated Conversion label in the corresponding fields.
- (Optional) Activate "Activate enhanced conversion data", to send additional user data, such as an email address or telephone number, to Google Ads. This helps improve the attribution of conversions, particularly for cross-device purchases.
- Save the configuration.
Hint: For Enhanced Conversions, you must also activate this function in your Google Ads account. You can find instructions here: Google Ads guide to extended conversions
How do I find my Google Ads conversion ID and the conversion label?
- Log in to your Google Ads account.
- Navigate to → Target project → Conversions → Summary
- Select an existing Conversion campaign or create a new one.
- Click in the area "Tag facility" on the tab "Set up the day yourself".
- In the "Event snippet" section, you will find both your conversion ID (e.g. AW-1234567890) and the conversion label (e.g. abc123XYZabcDEF456) under send_to.
Dynamic remarketing
If you want to use dynamic remarketing via Google Ads, you can specify a so-called "feed type key" in the plugin configuration. This is necessary so that Google can correctly allocate your product data and display suitable adverts.
Select the appropriate type depending on what you are applying for. The following options are available:
- retail
- education
- flights
- hotel_rental
- jobs
- local
- real_estate
- travel
- custom
For classic online shops, the following is usually "retail" the right choice.
You can find more information on use and setup in the official Google Ads Remarketing documentation:
https://support.google.com/google-ads/answer/7305793?hl=de&ref_topic=10070037#zippy
Configure consent management
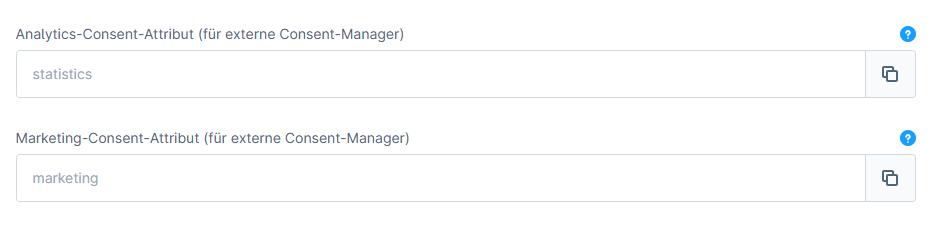
In the plugin configuration, select the consent manager that you use in your shop. Supported options include the Shopware Cookie Consent Manager, Cookiebot, Usercentrics, CookieFirst, CCM19, consentmanager.net and ACRIS EU Cookie Policy Pro.
In the „Expert mode“ field, you can enter a custom label or the key for your consent tool (if necessary). This option is particularly useful for external tools that require their own integration.

Assigning the cookie category: In the plugin settings, you can now explicitly specify the category in which the extension should appear in the frontend consent dialogue.
Expert settings (Consent-Free Tracking)
If you are using a special setup in which the Google Tag Manager is to be loaded independently of the cookie content, you can activate an additional container snippet here.
To do this, activate the option "Activate Consent-Free Google Tag Manager JavaScript snippet" and enter in the field below the corresponding Container ID (e.g. GTM-XXXXXXX).
This feature is intended solely for advanced use cases, for example if you are using tags that Do not collect any personal data or must be loaded before consent is given.
Please note: The shop operator is responsible for GDPR-compliant use. Only use this option if you are aware of the legal implications.
Consent Mode: Advanced
Optionally, the „Consent Mode Advanced“ switch can be enabled (disabled by default). If it is enabled, the Google container or gtag is loaded before consent is given. The consent defaults remain set to „denied“ (including ads_data_redaction), so only cookie-less pings are sent to Google, from which Google extrapolates conversions using modelling. The advantage is that conversion signals are retained even if visitors ignore the cookie banner.
Privacy notice: When the switch is enabled, the Google script is loaded before consent is given; amongst other things, the visitor’s IP address is sent to Google even before consent is given (data transfer to the USA). This practice is legally controversial. The shop operator is responsible for activating, verifying and managing this feature (including consultation with the data protection officer). The switch is disabled by default.
If an external CMP (such as Cookiebot, UserCentrics, CookieFirst or ACRIS) is used instead of the Shopware Cookie Consent Manager, this CMP must provide the consent signals. When Advanced Mode is active, the first page load for returning visitors who have already given their consent may be cookie-free, as the consent stored in the CMP, for technical reasons, only takes effect after the script has loaded. Full data is then transmitted. With the Shopware Consent Manager, this effect does not occur, as the stored consent is applied before the script is loaded.
GTM mode works with the GTM templates we provide (Consent Mode is already built in) without the need for any customisation of the container. In Analytics mode (gtag.js), data is sent directly; a container is not required here.
Opt-out link for Google Analytics
To deactivate tracking by users, add the following link to your privacy policy:
<a onclick="javascript:gaOptout();" href="javascript:void(0);">Switch off Google Analytics tracking for this website here</a>Set up server-side tracking
What is server-side tracking?
Server-side tracking is a modern method of collecting website data. Instead of sending tracking data directly from the browser to Google, it is first sent to a separate server and forwarded from there in a controlled manner.
Classic tracking: Browser → Google
Server-side tracking: Browser → Your tagging server → Google
Important concepts: Web vs. server container
To use SST, you need two different container types in Google Tag Manager. These fulfil different tasks:
| Container type | Task | Biloba template necessary? |
| Web container | Collects events (clicks, sales) in the browser. | Yes (JSON import) |
| Server container | Receives data & protects privacy. | No (standard) |
Prerequisites
To be able to use server-side tracking, you need:
- A Google Tag Manager server container: Created in your GTM account.
- A tagging server (hosted on Google Cloud Platform, AWS, or with a provider such as Stape.io)
- Your own subdomain (recommended, e.g. gtm.your-domain.com)
- Budget: Please note that SST incurs hosting costs (approx. 30-50 €/month depending on traffic).
HintServer-side tracking incurs ongoing costs for server hosting. The costs depend on your shop's traffic.
How the automatic redirection works
Thanks to our plugin you have to No transport URLs manually in the GTM interface customise.
- Simply import our JSON file into the Web container.
- Enter your server URL in the Plugin configuration in Shopware.
- The plugin automatically instructs the web container to send all data to your own server when loading in the shop.
Step 1: Create server container
- Open Google Tag Manager
- Click on „Create container“
- Select the target platform „Server“
- Follow the set-up wizard
Step 2: Set up the tagging server
Google offers two options:
Option A: Automatic provisioning (recommended for beginners)
- Google automatically sets up a server on Google Cloud Platform
- Simplest method, but less control over the infrastructure
Option B: Manual provision
- You set up the server yourself (Docker container)
- More control, but technically more demanding
- Can be hosted on any infrastructure
Detailed instructions from Google:
Step 3: Set up subdomain (recommended)
For optimal cookie functionality, you should have a subdomain of your website point to the tagging server:
gtm.your-domain.com → Your tagging serverThis makes it possible:
- First-party cookies (longer duration)
- HttpOnly-Cookies (more security)
- Better compatibility with Safari/ITP
Step 4: Configure plugin
- Open the plugin configuration in Shopware Admin
- Activate „Activate server-side tracking“
- Wear the Server container URL (e.g.
https://gtm.deine-domain.de) - Saving and clearing the cache
ImportantThe URL must be entered without a trailing slash!
- ✅ Correct: https://gtm.deine-domain.de
- ❌ Incorrect: https://gtm.deine-domain.de/
Functionality in detail
After activation, the plugin automatically changes all Google tracking URLs:
| Before | Afterwards |
|---|---|
https://www.googletagmanager.com/gtm.js | https://gtm.deine-domain.de/gtm.js |
https://www.googletagmanager.com/gtag/js | https://gtm.deine-domain.de/gtag/js |
In addition, the parameter server_container_url to all gtag('config', ...) Calls attached.
Source tracking (UTM / affiliate code)
Multitracking does more than just track Google events. The plugin also records the advertising source for each order directly in the Shopware data record. UTM parameters, advertising click IDs and the HTTP referrer are stored as Affiliate code and Campaign code in the order and are therefore immediately visible in the order list, without the need for external reporting.
What is recorded?
- UTM parameters:
utm_source,utm_medium,utm_campaign,utm_content,utm_term - Advertising click IDs:
gclid(Google Ads),fbclid(Meta),msclkid(Microsoft Ads),ttclid(TikTok) and others - HTTP Referer: is used as a fallback if there are no UTM parameters or click IDs
Behaviour
- By default activated. Once the plugin has been installed or updated, tracking begins automatically.
- Sticky per session: The first source value recorded is retained throughout the entire session and is carried over to the order when the purchase is completed. Subsequent clicks do not overwrite it.
- No override with manual
?affiliateCode=-parameters: If the URL is used to create your ownaffiliateCodeIf it has been set (e.g. by an existing affiliate programme), it remains unchanged. Source tracking does not overwrite it.
Important after the plugin update: So that the default value is permanently stored in the system_config-table, the switch in the plugin configuration area (card „Source Tracking (UTM / Affiliate Code)“) must be explicitly set once to To and stored. Only then does the SystemConfigService the value true. Otherwise, the default value will be used, but the value will not be visible in the configuration.
Custom UTM values take precedence
Using the switch Custom UTM values take precedence (The „Source Tracking (UTM / Affiliate Code)“ card) allows the extension to carry over your own UTM parameters from the landing URL into the order: utm_source as an affiliate code, utm_campaign as a campaign code. This also applies if a click ID such as gclid is included. Without the switch, the order will show „Ads“ / „Google Ads“ in this case.
The switch is off by default and only works when source tracking is active.
Example URL: ?utm_source=google_it&utm_campaign=pmax_shopping_best&utm_medium=cpc
Result in the order: Affiliate code „google_it“, campaign code „pmax_shopping_best (cpc)“.
- Is
utm_mediumIf set, it is appended to the campaign in brackets. - Missing
utm_sourceorutm_campaign, the corresponding field remains blank. Withoututm_campaignthe medium is not attached either. - Always give
utm_medium=cpcwith. Without a medium, visits without a gclid are categorised as „Unassigned“ in Google Analytics 4. - Letters, numbers, spaces and the following characters are permitted:
. _ - / | ( ) + : , ~ @ ! * #. A value must begin with a letter or a number, must not end with a space, and must be no more than 255 characters long. Any other values will not be accepted (nor will they be converted). The value0is considered not to have been set. - If no UTM values are provided, automatic source identification continues to apply (e.g. gclid = „Ads“ / „Google Ads“).
- Have further priority
?affiliateCode=and?campaignCode=in the URL, explicit AI agent parameters and a session assignment that has already been set. Only the first entry per session counts.
Make columns visible in the order overview
The recorded values are stored in the Shopware standard fields Affiliate code and Campaign code saved. These are hidden by default in the order list. Here’s how to make them visible:
- In the Shopware admin on Orders → Overview go.
- At the top right of the table header, click on the symbol with the three horizontal bars (Column settings).
- In the list the options Affiliate code and Campaign code activate.
- Save selection. The columns will now appear in the order list.
Lead conversion tracking for contact forms
Since version 6.14, the plugin has been recording not only purchases, but also Enquiries as conversions. Once a Shopware contact form has been successfully submitted, the plugin automatically triggers the GA4 event generate_lead from (in GTM mode as generate_lead-DataLayer event). Here’s how to measure lead conversions in Google Analytics 4 and Google Ads.
Furnishings
You’ll find the map for this in the plugin configuration „Lead Conversion Tracking“:
- „Record contact form submissions as lead conversions (generate_lead)“: triggers the lead event.
- „Lead conversion value“: Monetary value in the shop’s currency, which is sent with the event as a conversion value (for Google Ads). Default:
1.0.
Hint: The event is triggered as soon as a visitor successfully submits the Shopware contact form.
Custom snippets & GTM preview mode
For more advanced setups, the plugin offers two extension points for custom code, as well as a preview mode for Google Tag Manager.
Custom snippets (Head & Body)
On the map „My own snippets“ you can integrate your own code into the storefront:
- „Custom code in the head section“: is displayed unchanged in the header section of every storefront page. Suitable for additional loaders (e.g. a server-side GTM container), third-party consent tools or alternative trackers. You specify the enclosing script tags yourself.
- „Custom code after the body“: is output immediately after the opening `body` tag; this is common for the GTM Noscript fallback or for markup that must appear immediately after the `body` tag.
Important: The head code is without consent management loaded (before any cookie consent is given). It is your responsibility to obtain any consent required by law (e.g. GDPR). Faulty code may damage the storefront. Use at your own risk.
GTM Preview Mode (Environment Parameters)
The field „GTM environment parameters (preview mode)“ on the map „Google Tag Manager configuration“ loads a specific GTM workspace or the preview in the storefront instead of the live container.
- Parameters in GTM under Manage → Environments copy, e.g.
gtm_auth=ABC123>m_preview=env-3>m_cookies_win=x(without a leading?or&). - Leave this field blank to load the standard Live Container.
Coupon mapping (price context)
The plugin can pass price benefits on to GA4 as „coupons“, so that you can analyse purchases involving tiered pricing and RRP discounts in GA4/Google Ads reporting. You’ll find the toggles on the map „Coupon mapping (price context)“:
- „Passing tiered prices as item coupons“: If a product is actually purchased at a quantity-based tiered price (unit price below the base price), the plugin sets the field in the GA4 item
couponon the volume discount marker anddiscounton the amount saved. - „Pass on the RRP (strikethrough price) as an item voucher“: If a product is sold below its RRP / marked-down price, then
couponon the UVP marker anddiscountbet on the difference.
If both apply, the Tiered pricing takes precedence. The marker texts can be customised via the Storefront snippets (biloba.AdGoogleGtagsjs.coupon.graduated or. biloba.AdGoogleGtagsjs.coupon.uvp).
List context for product lists (from version 6.15 onwards)
From version 6.15 onwards, the events are passed view_item_list and select_item the appropriate GA4 list context for each product list (item_list_id and item_list_name). In Google Analytics 4, it is immediately clear from which list a product was viewed or clicked on – whether it was a category, search results, cross-selling or a CMS slider.
In addition, it fires view_search_results This is now also available in the search suggestions (Suggest/Autocomplete), not just on the full search results page. This allows you to track user behaviour as soon as they start typing in the search box.
No configuration required. List context tracking is automatically enabled following the update to version 6.15.
Custom parameters in the purchase event (for developers)
You can add the GA4 event purchase On the order completion page, you can specify your own parameters, such as a subscription flag, a customer segment or a field from the order. To do this, do not copy the entire template block into your theme; instead, use the extension point provided for this purpose. This way, you’ll still receive all updates to pricing, tax, coupon and consent logic, and your parameter will be transmitted in the same push.
The extension point
- Twig block:
page_checkout_finish_biloba_google_purchase_params - JavaScript variable:
bilobaGooglePurchaseParams(the flat parameter object of the GA4 event)
The block is fired immediately after the parameter object has been set up and immediately before the ‘push’ event. This applies to both tracking modes (Google Tag Manager and gtag.js directly) and to all pricing options. A single adjustment therefore covers everything.
Example for your theme
Place the file in your theme src/Resources/views/storefront/page/checkout/finish/finish-details.html.twig To:
{% sw_extends {
    template: '@Storefront/storefront/page/checkout/finish/finish-details.html.twig',
    scopes: ['default', 'subscription', 'mixed-subscription']
} %}

{% block page_checkout_finish_biloba_google_purchase_params %}
    bilobaGooglePurchaseParams.is_subscription = {{ page.order.customFields.isSubscription ? 'true' : 'false' }};
{% endblock %}
If you sell subscriptions (Shopware Commercial), leave the line with scopes It’s absolutely essential. Without it, the storefront will truncate the theme template for subscription orders, and your customisation will be lost without an error message. You don’t need to call the parent block; the block is empty in the extension.
Where the parameter is received
| Tracking mode | Where does the parameter end up? | What do you need to do on Google? |
| Google Tag Manager | As e-commerce. in the purchase-Message in the data layer | Declare a variable of type „Data Layer Variable“ with the name ecommerce.is_subscription and the data layer version „Version 2“, and add it to your GA4 event tag as an event parameter. The built-in e-commerce mapping in GTM only passes on the standard keys; custom keys are only sent to GA4 via this mapping. |
| Directly via gtag.js | As an event parameter of the purchase-Events | Register the key in GA4 as a custom dimension (Administration → Data View → Custom Definitions → Create Custom Dimension, scope „Event“) so that it appears in the reports. |
Important rules
- Just write something simple, synchronous JavaScript. The push can be delayed until cookie consent is given. The exact object you have modified is sent, so static values are safe. Promises or timers will miss the push.
- Enclose text in quotation marks and escape Twig output for JavaScript (Twig filter
ein the contextjs). - The standard keys (
transaction_id,value,currency,itemsetc.) Please do not rename or delete this. - Your customisation must be positioned above our extension in the template hierarchy. A theme always does this. If you make the customisation in a separate extension, it must be implemented using the method
getTemplatePrioritya priority that higher is less than ours (0), for example900. Otherwise, our empty block wins. - The Google Ads event
conversionis not extended via this block. - Developer tools that wrap each block in HTML comments (e.g. the Frosh Development Helper) insert this marker into the script tag. There, it becomes a JavaScript comment and overrides your first statement. Enter the block name in the Helper under
exclude_keywordsTry it, or test it with the helper disabled.
FAQs
Support
If you have any questions or problems, please do not hesitate to contact us:
- Support request: biloba-it.de/shopware-plugin-support
- e-mail: support@biloba-it.de
- Phone: +49 (0) 711 - 13633800
No solution found?
Describe your problem to us - we'll take a look at it and get back to you as soon as possible.
 German
  English