

AI Shop Assistant: General questions
Open AI: General questions
The OpenAI account can be accessed via this link: https://platform.openai.com/ .
Here you will find the management of the credit, limitation and the API keys, which are necessary for the extension!
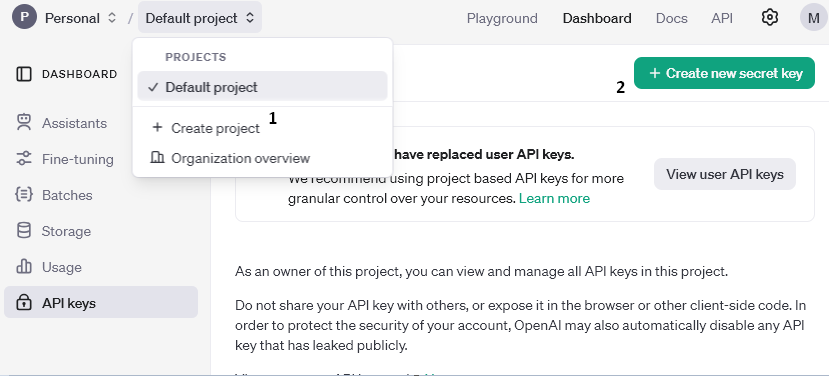
- A new project must be created first.
- A new API key can be created here and assigned to a project.
This key can be entered in the configuration of the extension.
Credits are required for the OpenAI API to work properly. As with other services, this is a “prepaid” system. You top up your credits, and they are automatically “deducted” as soon as you use the extension and send a request.
To top up credits with OpenAI, a payment method must be set up via your own profile.
The payment methods can be found under: Organisation -> Billing. Here, you can add a new payment method by clicking on “add payment details”. Once this is done, credits will also be topped up.
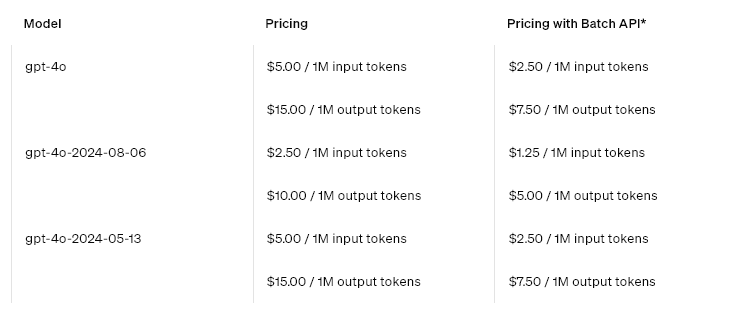
Credits are billed in dollars. OpenAI uses “tokens”; one token is equivalent to approximately 4 characters.
Overview table from OpenAI https://openai.com/api/pricing/:
If, for example, only a certain budget of credits per month is available or for protection, limits can be set.
Monthly limits can be set via the profile: Organisation -> Limits, as well as an e-mail notification as soon as a certain amount is reached.
OpenAI offers access across various “tiers”. Initially, every user is placed in the “Free” tier, which severely restricts the use of the AI models to just a few requests per minute. Once $5 has been paid for, these restrictions are significantly reduced and the service can be used more efficiently.
Further information on the limitations can be obtained directly from OpenAI: https://platform.openai.com/docs/guides/rate-limits/usage-tiers?context=tier-free
You can see which current “animal” has been unlocked in your account here: https://platform.openai.com/settings/organization/limits
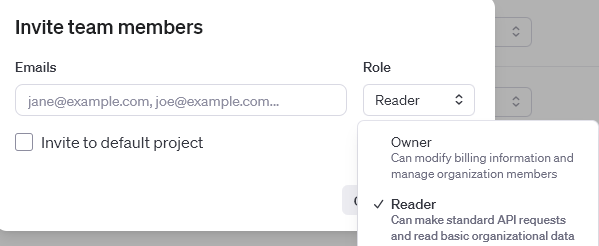
If you would like someone else to be able to check settings and limits, you can invite “members” to join the organisation.
You can find the area here: https://platform.openai.com/settings/organization/members
You can add a new person here by clicking “invite”. There are two role options to choose from; here you can specify whether the new member can only view certain data or can also contribute to the organisation. As the first option is quite limited and certain tasks cannot be delegated, it is advisable to assign the “Owner” role.
For technical reasons, the extension only works on the domain for which it was purchased.
Staging and test environments are not supported.
 German
 English